


Building applications is a passion shared by software developers around the world. But the administrative overhead of managing code signing is dreary. How can we get it right the first time? Lewis Cianci looks into it.
Let me just say this upfront.
Code signing is so boring it makes my teeth ache. It is a concept that exists with a good reason. I mean, you want people to be sure that your software package is actually from you, right?! And yet, it’s something that so many developers struggle to get right on daily basis. It’s like doing your taxes after a full year of working and having so many forms to fill out. Yippee.
Scroll down if you just want to see the step-by-step guide on Android code signing and are not interested in why we do this😉
So, let’s get started, but first, let us know what’s your relationship with CI/CD tools?
Why we code sign
We sign our packages so people who download our package from the Play Store actually know it’s us. We do this by signing our package with a key that we generate. When we upload our signed package to Google Play, it remembers the key that was used to upload the initial package and makes sure subsequent packages are signed with the same key.
To achieve this goal, Android package signing actually takes advantage of a tool that comes from the Java Development Framework called keytool. Keytool has been around for probably as long as the JDK itself, so it’s pretty old. This lends itself to probably some of the reasons why signing an APK or AAB (android app bundle) is as confusing as it is.
Why can’t the Play Store just handle code signing for us?
We’d be tempted to ask for a nirvana where we could just give all our unsigned app bundles to the Play Store and just have them work it out and just sign it for us. The logic of that quickly breaks down though. If you wrote a book, would you get someone else to sign it? No. You’d sign it because you are the author.
These days code signing is a lot easier than what it used to be. As long as we always sign our packages with the same key (the “upload key”), Google Play will actually generate and manage our code signing keys for us.
If you are particularly enterprising, you can attempt to read and understand everything here, but I’ve been developing for Android for the better part of three years now and I’m sad to say that even I don’t understand it completely. All I know is that when it breaks, it is a huge pain to fix.
Let’s take the time to understand not only how to code sign but also why we code sign. When we understand the necessity of this process, it will make it easier to complete.
Codemagic also allows you to code sign and publish iOS apps.
What we need for code signing?
The short version is here. For code signing we need:
- create the Java Development Kit (JDK) file;
- to sign our app bundle or APK with our private key;
- modify the build.gradle;
- send package to the distributor (Google Play).
In the end of this article you will also find how to make code signing work with Codemagic.
Now a bit longer version with step-by-step guide on what we need for Android code signing and how to do it.
Step-by-step guide for Android code signing
STEP 1: The Java Development Kit (JDK)
If you are developing for Android, you probably already have these installed.
We need to create a Java Key Store (JKS) file that contains our signing information. In generating a JKS for our app, we’re actually creating a private key on our computer. This private key is protected by a password that we set.
From a command prompt, we can type the following to get a JKS.
keytool -genkey -v -keystore %DESKTOP%/key.jks -storetype JKS -keyalg RSA -keysize 2048 -validity 10000 -alias DEVELOPERNAME
We’re telling keytool to generate a Java Key Store and put it in our desktop. This key will be valid for 10,000 days or roughly 27 years, allowing us to push updates for the lifetime of our app. We’re also required to set an alias. I just make this my developer name or something I will remember.
keytool will prompt for various pieces of information along the way. It’s important to specify these correctly as we are essentially defining the details for our private key.
You’ll be prompted for:
- Keystore password – you’ll need this to unlock this keystore again in the future. If you lose this password, it is pretty much impossible to recover it.
- Re-enter keystore password
- Personal details about what to put in the personal certificate
We will be prompted to fill out some details about us. These are the details that are associated to our private key, so they should be somewhat relevant. It’s up to you what you put in these fields, but as a rule of thumb, I wouldn’t make it too crazy.
This is keytool’s output.
C:\code\signingtest\android\app>keytool -genkey -v -keystore key.jks -storetype JKS -keyalg RSA -keysize 2048 -validity 10000 -alias androidapps

Enter keystore password:

Re-enter new password:

What is your first and last name?

[Unknown]:  Codemagic Article Dude

What is the name of your organizational unit?

[Unknown]:  Fantastic Apps And Where To Find Them

What is the name of your organization?

[Unknown]:  Greatapps

What is the name of your City or Locality?

[Unknown]:  Estonia

What is the name of your State or Province?

[Unknown]:  Tartu

What is the two-letter country code for this unit?

[Unknown]:  EE

Is CN=Codemagic Article Dude, OU=Fantastic Apps And Where To Find Them, O=Greatapps, L=Estonia, ST=Tartu, C=ES correct?

[no]:
Pay attention! If you just spam Enter through this process, the creation will just loop over and over again as you are answering ‘no’ to the last question.
In doing this, we’ve created a JKS and we’ve put our own generated private key into it. Because we’ve generated it and we’ve set the password, we can be sure that anyone who has this JKS file is either us or is specifically allowed to be using it.
If someone has your JKS and the correct credentials, they can sign packages as you or your company. Keep it safe, don’t put it on source control.
Now we have our Java Key Store, so we’re halfway through! Rejoice accordingly.
STEP 2: Signing our app bundle or APK with our private key
Now, we want to sign our app bundle with that JKS that we just made. It’s possible to manually code sign our APK or release build every single time, but in reality, we’d be better off configuring it so when we run flutter build apk --release it just automatically signs our package with the right upload key. The Flutter documentation talks about how to update the Gradle files here, but we’ll go through it slowly and explain it along the way.
To get started, let’s open our flutter_app/android/app/build.gradle file. On about line 49 we can see this:
buildTypes {
    release {
        // TODO: Add your own signing config for the release build.
        // Signing with the debug keys for now, so flutter run --release works.
        signingConfig signingConfigs.debug
    }
}
The main thing that is happening here is that our builds are being signed with the debug keystore, so our release build still works. We want to change this so that our releases are signed with our own keystore. That way they can be uploaded to the Google Play store.
The first thing we do is create a key.properties in our app directory. We create this in flutter_app/android/key.properties.
key.properties will include all the details we need to successfully sign our package.
storePassword=The JKS store password

keyPassword=The key password

keyAlias=The alias for your key

storeFile=Where to look for your keystore file
A quick note on source control
You should think before you check this code into source control. If bad actors were to get access to the keystore and these credentials, and they had control over your accounts, they could potentially push a new update to your app with malware or other bad things. Most CI/CD solutions let you supply these details as “secrets”, but the implementation differs per platform.
STEP 3: Recap & Modifying the build.gradle
We’ve made a keystore file, and specified an alias, as well as a password to protect they keystore. If we’re using Google Play app signing (which you use by default), then the key that we have generated acts as our upload key. The first package that we upload via the Google Play console will be signed with this key. This proves to Google that we are who we say we are.
Makes sense? Cool, let’s make it sign as part of our Flutter build process.
Modify the build.gradle
Open up flutter_app/android/app/build.gradle. On about line 31 or so you should see text like this:
android {
    compileSdkVersion 29`
    lintOptions {
        disable 'InvalidPackage'
    }
...
We want to tell Gradle where to find the key store. We do that by putting these details on about line 28, above the android { statement.
def keystoreProperties = new Properties()
def keystorePropertiesFile = rootProject.file('key.properties')
if (keystorePropertiesFile.exists()) {
    keystoreProperties.load(new FileInputStream(keystorePropertiesFile))
}
Let’s break the above down…
We define a keystoreProperties variable. Then, we check to see if key.properties exists relative to the root of our android project (not the Flutter project).
When our build runs, it loads key.properties. key.properties identifies the location of the keystore, plus the needed credentials to unlock the Java Key Store to sign the package. With all the required details in hand, Gradle now signs the app bundle or APK as part of our release build.
Let’s just double check that that all our files are in the right spot.
Our modified build.gradle is in flutter_app/android/app/build.gradle.
Our key.jks file is in flutter_app/android/app/key.jks.
Our key.properties file is in flutter_app/android/key.properties.
Once we are sure about the above, we should be able to run flutter build apk --release now and signing should work fine.
STEP 4: Sending it to Google Play Store
Now we can upload our APK or app bundle to the Play Store. When we do this with our signed package, and with Google Play Signing on (which it is by default), Google will acknowledge the key that we have used to sign the package and remember it as our upload key. Google will then sign our APK or app bundle with their own key. It’s important that any subsequent updates we provide for this app, we sign with this same key. Google Play recognises this key as our upload key and we can’t release updates without it.
I don’t understand any of the above and I would appreciate an incredibly visual illustration of what exactly is happening.
Can do! This is what’s happening.
- We generate a super secret way to identify ourselves, almost like we make a passport for ourselves.
- Because anyone with this ‘passport’ will be able to positively identify themselves as us (ie: impersonate us without much resistance), we lock it behind a password in our safe (the JKS, or Java Key Store).
- We create the app bundle or APK, and then sign the package with the same signature that we used on the passport. In order to access this passport, we have to unlock the safe that the passport is in (by providing the password and alias to the Gradle build process).
- We send package to the distributor (Google Play). The distributor, seeing the package for the first time, takes note of our signature that we used on this package and takes a copy of it.
- When we send packages to our distributor (Google Play) in the future, we sign these packages with the same details we used initially. Our distributor, remembering the details we used initially to upload the package, either accepts or rejects the package. If it matches (if the upload key is the same as the one we used initially), then the package is accepted and distributed. Otherwise, it’s not accepted.
- Our distributor, knowing that the initial package and potential future packages are definitely from us, distributes the package.
Making code signing work with Codemagic
We ultimately want to sign this as part of our CI/CD workflow but at the same time, we don’t want to check in our keystore and properties file to source control. Instead, we want our CI/CD provider to build the package and then sign it later in the build process with a keystore that we provide.
Setting it up with Git
If we’ve got a totally new Flutter app, then we can switch to the folder and type in git init to start using source control with the app.
By default, we’ll just happily check in our keystore and keystore properties file which is a bad idea from a security perspective.
You should get this right from the start
If you accidentally check in your keystore properties and keystore file and push those changes, people will be able to pluck those files out at any time in the future by looking through your Git history. You can manually remove files from Git in the future, or you can reinitialize your repository without those files but it’s better to just not check them in the first place.
We want to add these lines to the end of our .gitignore file:
# Don't check in the keystore files or equivalent

*.jks
key*.properties
No Java KeyStore (JKS) or properties for code signing will be checked in to source control. How lovely.
Making build.gradle not sign when running on CI/CD
While your project is building, the keystore and settings aren’t available. We want the build to still produce a release build even though it isn’t signed.
This is the part of my build.gradle that allows for this:
signingConfigs {
    file(rootProject.file('key.properties')).with { propFile ->
        if (propFile.canRead()) {
            release {
                keyAlias keystoreProperties['keyAlias']
                keyPassword keystoreProperties['keyPassword']
                storeFile file(keystoreProperties['storeFile'])
                storePassword keystoreProperties['storePassword']
            }
        }
        else {
            print('not signed')
        }
    }
}

buildTypes {
    release {
        file(rootProject.file('key.properties')).with { propFile ->
            if (propFile.canRead()) {
                // because we can read the keystore
                // we are building locally
                // so sign locally
                // otherwise build an unsigned apk for later signing by the CI/CD provider
                signingConfig signingConfigs.release
            }
        }

        applicationVariants.all { variant ->
            variant.outputs.all { output ->
                output.outputFileName = "app-release.apk"
            }
        }
        // TODO: Add your own signing config for the release build.
        // Signing with the debug keys for now, so `flutter run --release` works.
        // signingConfig signingConfigs.release
    }
}
Setting up Codemagic to sign our builds
In your build process, find the Android code signing section (it’s in the Publish section). It looks like this:
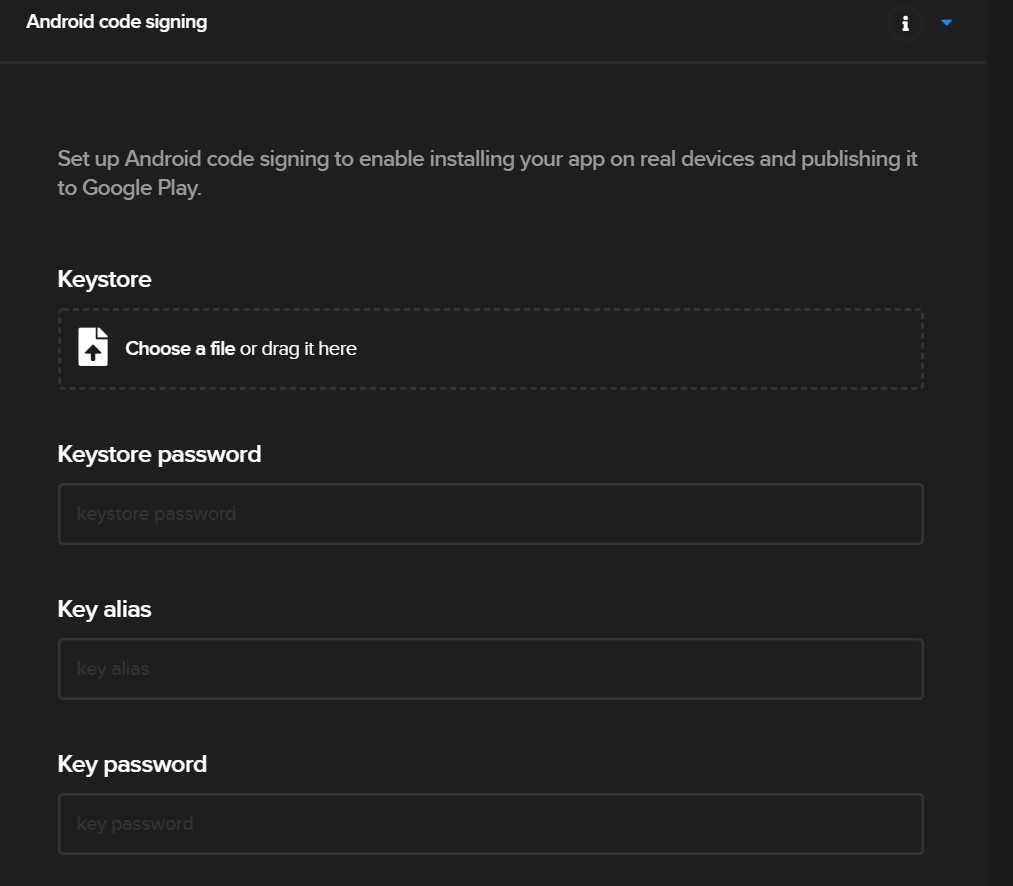
Now, we upload our keystore and set our password, key alias, and key password (which are the same as what we set initially in our keystore.properties file).
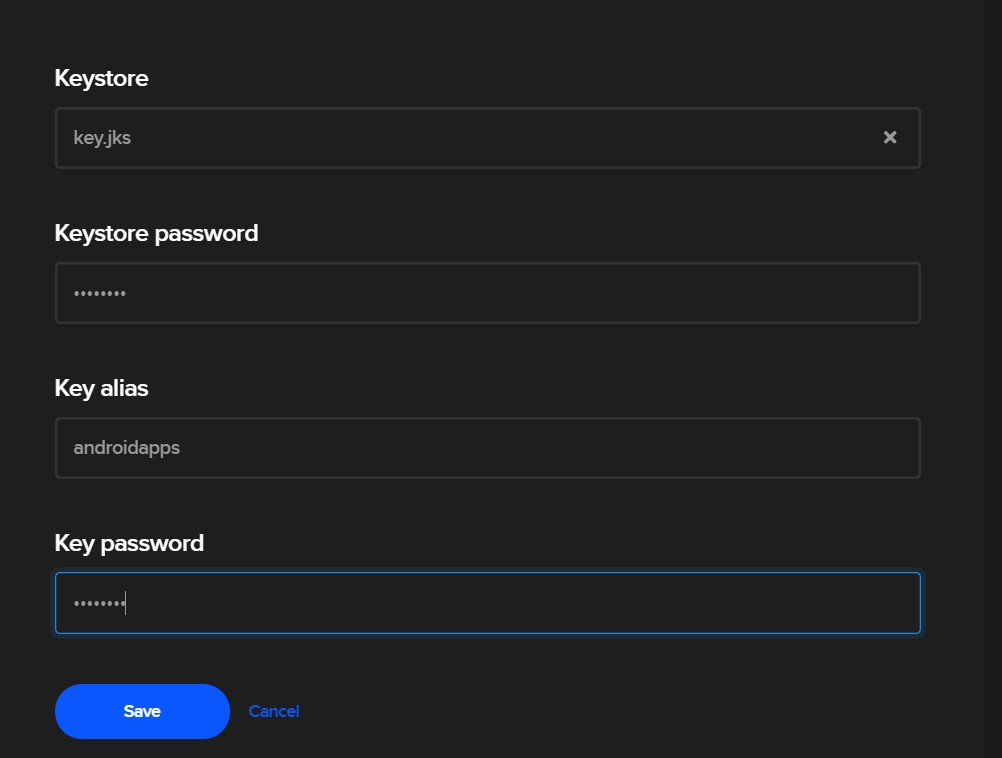
Then we hit “Save”. When Codemagic runs our build process, it will automatically produce a signed APK or App Bundle for us.
And that’s pretty much it! With this signed APK or App Bundle, you can deploy your app to the Play Store.
You can check out my Git repo for an example here (obviously, without the keystore or properties).
That’s it.
If you are still lost, feel free to let me know at @azimuthapps and I’ll try to help out. It can be frustrating to get it right, but once you do, it should work for the foreseeable future.
Lewis Cianci is a software developer in Brisbane, Australia. His first computer had a tape drive. He’s been developing software for at least ten years, and has used quite a few mobile development frameworks (like Ionic and Xamarin Forms) in his time. After converting to Flutter, though, he’s never going back. You can reach him at his blog, read about other non-fluttery things at Medium, or maybe catch a glimpse of him at your nearest and most fanciest coffee shop with him and his dear wife.
More articles by Lewis:

