


Jahswill Essien explains in this article Flutter isolates through interesting and easy-to-understand examples.
The word “isolate” shouldn’t be new to you — since the pandemic started, it has become a buzzword. Chances are you’ve also heard the term used in relation to Flutter, but what exactly is an isolate in this context? How does Dart execute code? How do you implement a isolate? All these questions will be answered in this article.
If you’re a beginner in Flutter development, this article is for you, as I’ve tried to simplify a lot of concepts. However, this article can also be helpful if you’re an experienced developer. We will be using the analogy of a coffee kiosk to help explain the concept of Flutter isolates.
Execution of code in Dart
Dart is a single-threaded language. To understand what this means, we first need to understand what threads are.
What is a thread?
A thread is a unit of a process. It is a small set of instructions designed to be scheduled and executed independently of the parent process.
The term process in computing refers to the state of a program that is in execution.
You might be wondering something: If Dart is a single-threaded language, how can asynchronous tasks in Flutter (like fetching data via an HTTP call) perform optimally without hindering other activities of the application? Well, this leads to two different concepts, concurrency and parallelism, the former standing for async tasks and the latter for tasks running on an isolate. To understand these concepts, let’s cook up two scenarios.
Scenario 1 (concurrency)
You decide to go get a coffee in the coffee shop. (Assume that the coffee shop is an enclosed room with just a door.) There’s a long queue, but you decide to wait for your turn regardless. The barista (the person who prepares and serves the coffee drinks) processes the orders of each next customer in the queue, one after another.
Let’s say there’s a shift change between barista A and barista B. This delays the process of ordering a coffee, so the customers have to wait for barista B to take over and resume serving coffee to the next customer in line to get the queue moving again. The transition between barista A and barista B does not otherwise impede the actions of the customers, as they can still talk to each other, move their bodies, and so on.
Asynchronous code in Dart works in a similar way. When you use the await keyword on an async task, other parts of the program keep running, and when the async task is completed, the program resumes from the next line of code. An async task is a Dart event loop jumping between different parts of your program (processing events) as needed. The code sample below shows this in action.
void asyncTask() async {
   /// Waits for this 5 seconds to elapse
   final result = await Future.delayed(Duration(seconds: 5));

   /// Then proceeds to run other lines of code
   /// While waiting, this does not block off other programs running
   print(result);
 }
Scenario 2 (parallelism)
This time, you and your friend decide to go to the coffee shop, but the first shop has a long queue and a lot of delays. So your friend decides to go to the next coffee shop, leaving you in the first coffee shop.
In this scenario, we can say that the process of you getting a coffee in the first coffee shop and your friend getting a coffee in the next coffee shop is happening in a parallel manner, as whatever happens in the first coffee shop does not affect the next coffee shop.
To run a set of programs in a parallel manner, isolates come into play. But before we discuss how they do so, we need to first understand what isolates are in Dart.
What is an isolate?
One thing to note before we talk about Isolate is that Dart programs run in an isolate by default. Think of an isolate in Dart as that small room within a coffee kiosk where activities like making coffee drinks and ordering coffee take place. Isolate is like a little space in a machine, with its memory (a system that stores information that will be needed soon on a short-term basis) and a single thread running an event loop that processes the code.
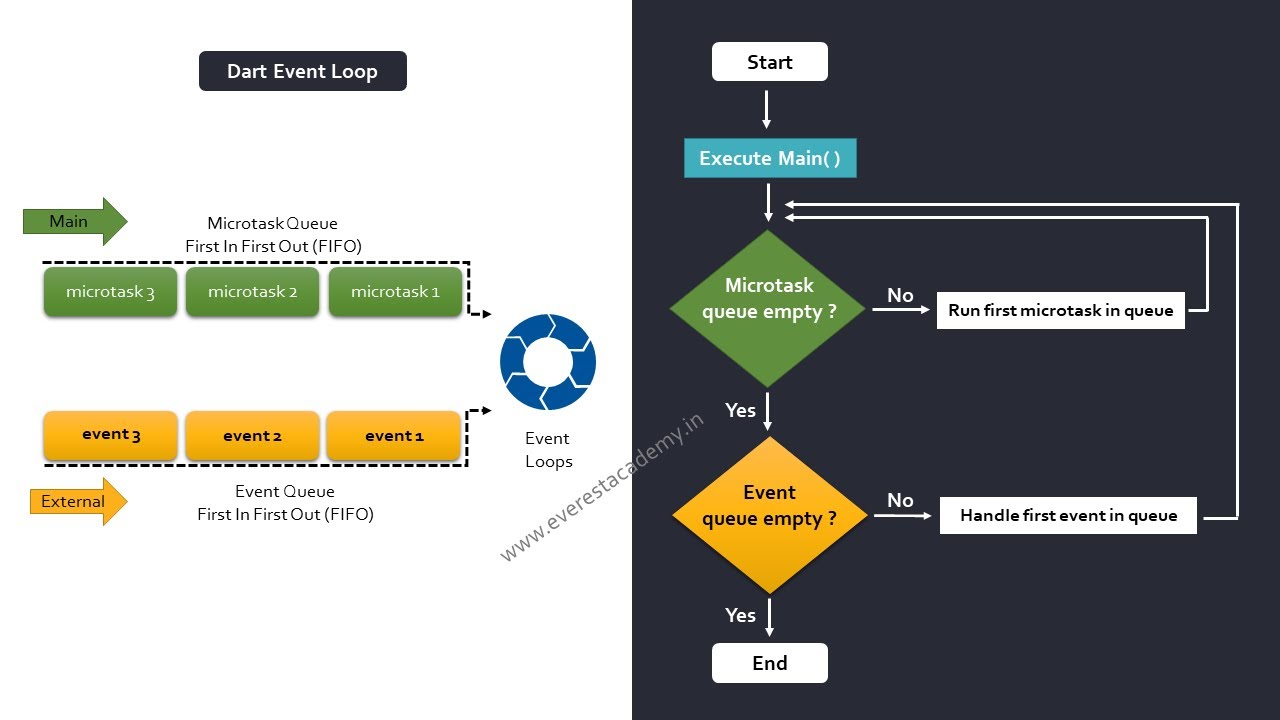
What is an event loop?
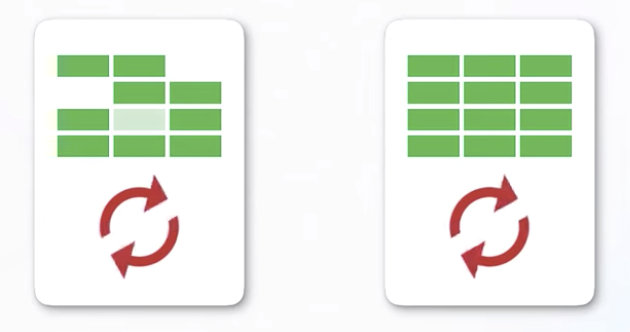
In our analogy of a coffee shop, the barista has to process the orders of each customer in line, one after another. The barista processes orders in a FIFO (First In, First Out) manner, meaning the first customer in the queue is the first to be out of the queue. In Dart, the event loop works similarly to that barista in the coffee shop: It grabs an older event from its event queue, processes it, attends to the next event, and processes it until the events in the event queue are exhausted. Here’s an image that describes this process.
Source. An animation depicting how event loops work in Dart.
Dart multithreading
Remember that we mentioned Dart is a single-threaded language. But what if we have some very heavy computation code to run? In this case, doing the task in an async method will most likely cause lag in the application, so we need a way to perform this task on a different thread.
To accomplish multithreading in Dart, we need to spawn a new isolate. It is important to note that in Dart, isolates do not share memory with other isolates. Rather, they are completely isolated from each other (oh, poor isolates…), hence their name.
The new isolate will contain its own memory and event loops. Think of this as running a standalone Dart application. There’s good news, though: Two isolates can communicate with each other by passing messages back and forth. Below is an illustration of this.
Source. A depiction of two isolates with their own event loops and memory.
There are two ways to create a different isolate in Dart: the Isolate.spawn() function and the compute() function.
Create a new isolate using Isolate.spawn()
Let’s look at some Flutter isolate examples. The first way to create an isolate is by using the Isolate.spawn() call. We pass in the method we want to run as the first parameter, while the second argument is the parameter we want to pass to the isolate.
The function passed to the isolate spawn() must be a top-level function *(a function that is not within the boundary of a class) or a static method.
Here’s the code to create an isolate.
import 'dart:isolate';

void main() {
  Isolate.spawn<IsolateModel>(heavyTask, IsolateModel(355000, 500));
}

void heavyTask(IsolateModel model) {
 int total = 0;


 /// Performs an iteration of the specified count
 for (int i = 1; i < model.iteration; i++) {

   /// Multiplies each index by the multiplier and computes the total
   total += (i * model.multiplier);
 }

 log("FINAL TOTAL: $total");
}

class IsolateModel {
 IsolateModel(this.iteration, this.multiplier);

 final int iteration;
 final int multiplier;
}
Communicate between two isolates
Communication between two isolates can be accomplished by sending messages or values through the ports (ReceivePort and SendPort). These ports work similarly to Stream; in fact, ReceivePort implements the Stream abstract class.
SendPort can be created from ReceivePort by calling ReceivePort’s sendPort getter method. This is the medium through which messages are being sent to ReceivePort. The ReceivePort, on the other hand, listens to messages from its SendPort.
To see a visual representation of this process, take a look at the image below:
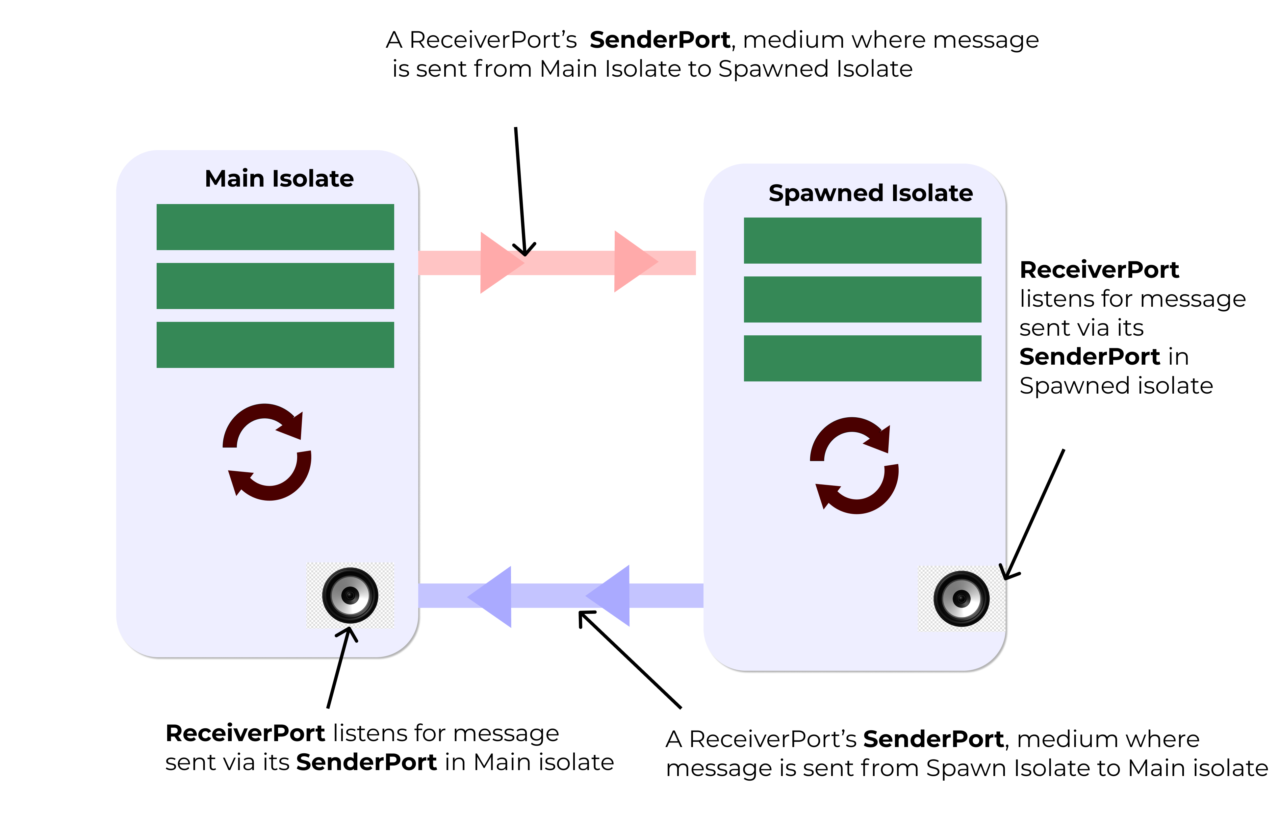
A pictorial illustration that describes how a message is sent between two isolates. A SenderPort can be sent as a message via SendPort, giving access to the recipient isolate to communicate back.
Here’s a code snippet that shows communication between isolates. Heads up — the code is a bit confusing. I’ve added some comments to help you understand how it works. Typing out and running the code helps too. While reading the code, assume Mike is the name of your friend.
import 'dart:isolate';

void main() {
 createIsolate();
}

Future createIsolate() async {
 /// Where I listen to the message from Mike's port
 ReceivePort myReceivePort = ReceivePort();

 /// Spawn an isolate, passing my receivePort sendPort
 Isolate.spawn<SendPort>(heavyComputationTask, myReceivePort.sendPort);

 /// Mike sends a senderPort for me to enable me to send him a message via his sendPort.
 /// I receive Mike's senderPort via my receivePort
 SendPort mikeSendPort = await myReceivePort.first;

 /// I set up another receivePort to receive Mike's response.
 ReceivePort mikeResponseReceivePort = ReceivePort();

 /// I send Mike a message using mikeSendPort. I send him a list,
 /// which includes my message, preferred type of coffee, and finally
 /// a sendPort from mikeResponseReceivePort that enables Mike to send a message back to me.
 mikeSendPort.send([
   "Mike, I'm taking an Espresso coffee",
   "Espresso",
   mikeResponseReceivePort.sendPort
 ]);

 /// I get Mike's response by listening to mikeResponseReceivePort
 final mikeResponse = await mikeResponseReceivePort.first;
 log("MIKE'S RESPONSE: ==== $mikeResponse");
}

void heavyComputationTask(SendPort mySendPort) async {
 /// Set up a receiver port for Mike
 ReceivePort mikeReceivePort = ReceivePort();

 /// Send Mike receivePort sendPort via mySendPort
 mySendPort.send(mikeReceivePort.sendPort);

 /// Listen to messages sent to Mike's receive port
 await for (var message in mikeReceivePort) {
   if (message is List) {
     final myMessage = message[0];
     final coffeeType = message[1];
     log(myMessage);

     /// Get Mike's response sendPort
     final SendPort mikeResponseSendPort = message[2];

     /// Send Mike's response via mikeResponseSendPort
     mikeResponseSendPort.send("You're taking $coffeeType, and I'm taking Latte");
   }
 }
}
The above code can be said to be overengineered, the reason being that isolates should only be used when performing heavy computational work that must be run on a different thread to avoid causing lag on the main thread. That said, the purpose of the code above is simply to show how different isolates can communicate with each other.
When an isolate executes all events in its event loop, Dart automatically kills the isolate. To kill an isolate manually, use isolate.kill(). To pause an isolate, use isolate.pause(). To resume a paused isolate, use isolate.resume().
Create a new isolate using compute()
An easier way to create a new isolate is by using compute(), though the trade-off is that you lose a lot of the flexibility Isolate.spawn() offers.
compute<Q, R>() accepts two generic types: Q is the isolate function parameter type, and R is the return type of the isolate function. The code snippet below shows how to implement this.
import 'package:flutter/foundation.dart';

void main() {
  compute<IsolateModel, void>(heavyTask, IsolateModel(355000, 500));
}

void heavyTask(IsolateModel model) {
int total = 0;

/// Performs an iteration of the specified count
for (int i = 1; i < model.iteration; i++) {

  /// Multiplies each index by the multiplier and computes the total
  total += (i * model.multiplier);
}

log("FINAL TOTAL: $total");
}

class IsolateModel {
IsolateModel(this.iteration, this.multiplier);

final int iteration;
final int multiplier;
}

Conclusion
In conclusion, multithreading is possible in Dart, even though Dart is a single-threaded language. There’s one caveat: Dart applications are already very fast and highly optimized, and most of the time, you shouldn’t have to use isolate. Only use it when heavy computational work needs to be done. We’ve also discussed what event loops are and how they work in Dart, and we’ve looked at how isolates can communicate even though they do not share memory.
As a Flutter developer, after wrapping up a feature or fixing a difficult bug, you’ll most likely be burdened with having to build the iOS or Android application for distribution to the QA testing team or for release. At times like these, you probably wish you could spawn some magic “isolate” to handle building and uploading your apps for you while you focus on getting your work done.
Here’s where Codemagic comes to the rescue! Think of Codemagic as that “isolate” — you don’t have to worry about building an .apk or .ipa or releasing applications manually. Codemagic is a continuous integration and delivery tool that you can configure easily to automatically build and upload your .apk or .ipa file to platforms like Firebase App Distribution, TestFlight, Google Play Store, and App Store Connect in response to events like a Git branch merge or push. Just visit Codemagic to get started.

Jahswill Essien is a mobile developer, ardent on building awesome stuff with Flutter, he has been using Flutter for the past 2 years. Jahswill is a visual learner as such he strives to write articles that contain pictorial illustrations and/or analogies to drive home a concept explained. His favourite quote is: “We are constrained by our mind, what we feel is our limit isn’t our limit. It’s amazing how much we can learn in a short amount of time by perseverance alone”. Check out some things Jahswill built with flutter by visiting his Github profile.


