


This post is written by Mina Pêcheux
This post has been updated in July 2022 to introduce some fixes to the codemagic.yaml file and to reflect that you no longer need to contact Codemagic solution engineers to set up Unity machines for you, and you start using Unity on Codemagic right away, as it is preinstalled on Mac, Linux and Windows build machines.
The more you work on larger Unity projects, the more you see that there are areas of expertise that are fundamental to building a solid, long-term project that you may not have considered while working with smaller Unity projects. In particular, unit testing is a must, although it’s complex and sometimes a bit boring. With unit testing, by splitting your codebase into tiny logical units and checking that each one works at a granular level, you ensure solid foundations for your app and avoid code regressions.
But setting up unit tests and having them run automatically can be quite tricky in Unity. So today, let’s discuss how to create and automate Unit tests in Unity using a CI/CD pipeline built with Codemagic.
So, in this article, you’ll learn:
- Why automated unit tests are necessary for effective Agile development.
- The problems with setting up unit test automation in Unity.
- How to create a basic Pong game, which we’ll be using as a sample project.
- How to set up unit tests for our Pong game.
- How to set up Codemagic to automate unit testing and building for Unity projects.
Let’s go!
DevOps and automation
“DevOps,” which is a concatenation of “development” and “operations” (“ops”), is a fuzzy word that can describe various things: a team (the DevOps Team), a set of practices, a philosophy… All in all, it’s about using the best of the worlds of development and IT to produce better code and deliver releases easily and continuously.
DevOps is a philosophy commonly followed by web developers, for example. When you work on a big online platform, you’ll need to regularly ship new versions and upgrade the software for your customers. Since it’s an online service, you essentially need to replace the source code somewhere on a computer (we all know that any cloud is just someone else’s computer) with the latest updates to publish your new release.
But you naturally want to avoid publishing a large bug or blocking your infrastructure because of a bad line of code. And given how often you’ll want to release something new (be it a huge refactor or a very small bug fix), it would be best to have all the testing for bugs and publishing done automatically, right?
That’s the whole point of one of the core concerns of DevOps: continuous integration and continuous delivery, or CI/CD. These are key processes in traditional software engineering that aim to automate the delivery of your product alongside the version control tools while also making sure that this delivery won’t cause any issues, result in downtime, and require quick fixes.
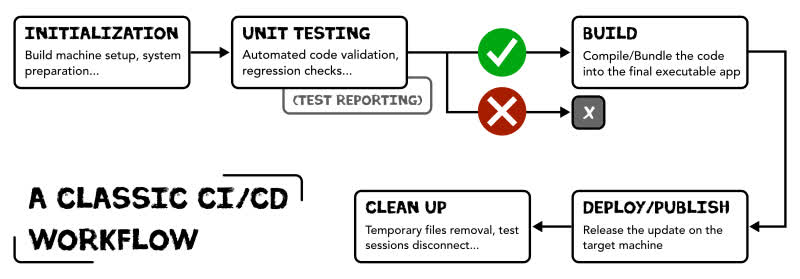
That’s why unit testing is a fundamental concept for DevOps and automation: It is one of the key blocks in this chain of automation because it ensures that the code you release is valid and won’t crash the product upon release. So CI/CD processes usually integrate unit testing somewhere as a required step. Basically, if the unit tests fail, then the delivery process is interrupted, and the buggy version doesn’t get released.
Unity and automation
The problem with Unity’s barebones CI/CD tool
However, I personally think that Unity isn’t really optimized for automating delivery. The DevOps philosophy is not that readily available when working with this engine.
To be fair, there are now tools built into the Unity engine for this, namely Unity Cloud Build, that try to fill this gap and satisfy the need to automate Unity projects. But they have their limitations. In particular:
- Unity Cloud Build doesn’t allow for publishing. Quite often, your CI/CD pipeline ends with the actual delivery of your update to a target device or an online store (like Google Play or the App Store). Unity Cloud Build can’t do that, and you still have to take care of this final step manually!
- The tool is also pretty slow: Even if there are some caching options, Unity Cloud Build is clearly not optimized for speed at the moment.
- Also, Unity Cloud Build is not that great with Git (partly because Unity relies more on Perforce, which is usually better for sharing digital assets… but is also used less by many developers!).
- Finally, Unity Cloud Build works for pure Unity projects, so if your project combines Unity with, say, React Native or another framework, you won’t be able to use Unity Cloud Build for it.
All of this makes the Unity Cloud Build a nice but still imperfect choice for Unity CI/CD. It will help you with automation only to a certain degree, and it might enforce some pretty “edge-casey” habits…
How Codemagic can help
On the other hand, if you don’t want to deal with these various difficulties, a possible alternative to Unity Cloud Build is Codemagic!
This online tool allows you to quickly set up CI/CD by connecting your Git repositories and completing just a few configuration steps. It’s also a convenient way to get access to specific hardware: With Codemagic, you can easily build your game for Mac, iOS, Windows, Android, etc. The service also scales well in terms of price and makes it simple to publish your project on the App Store or Google Play.
So, today, let’s see how to use Codemagic to set up some automation for a sample Pong-like Unity game.

A basic example: Re-creating Pong
Note: The code for this example project is available on GitHub! 🚀
Now that we’ve discussed the issues with and possible solutions for implementing CI/CD with Unity and, more specifically, the importance of unit testing in this automation process, let’s create a sample Unity project as a basic example that we will then “automate” using Codemagic. We are going to re-create the famous Pong game — with unit tests!
Coding a basic Pong game
For this project, the point is not to invent a brand-new game and discuss game design. Rather, I’ll take a very well-known game, Pong, and re-code it partially; then, I’ll use unit testing to check that it works properly.

The main idea for this game is to have:
- A
PaddleManagerC# class to control each paddle (with<W>and<S>for the left paddle and the up/down arrow keys for the right paddle); their movement will be constrained to the camera view. - A
GameHandlerand aGameManagerthat create the paddles, keep track of the score, and respawn the ball with a random velocity. I decided to separate my core functions to aGameHandlerclass (which is not a MonoBehaviour but a vanilla C# class) to make it easy to run them in my unit tests! - A
ScoreTriggerthat is applied to 2D trigger colliders on the left and right borders of the screen. This checks if the ball goes out of bounds — if it does, then the opponent gains one point and the ball is respawned.
The game will run forever once started, so I won’t prepare any additional menu or pause feature and simply focus on these core mechanics of the Pong game. I’ll rely on Unity’s 2D physics for the various bounces and collisions and prepare a scene with the following elements:

- Two paddles (2D rectangles with a BoxCollider2D component and the
PaddleManagerscript). - The ball (a 2D circle with a CircleCollider2D and a Rigidbody2D component).
- Two physical walls at the top and bottom of the screen (to constrain the ball to the camera view and have it “bounce” off the borders of the screen).
- Two triggers on the left and the right sides of the screen (invisible 2D elements that each have a BoxCollider2D component with the
isTriggerflag enabled and theScoreTriggerscript attached).
Installing Unity’s Test Framework package
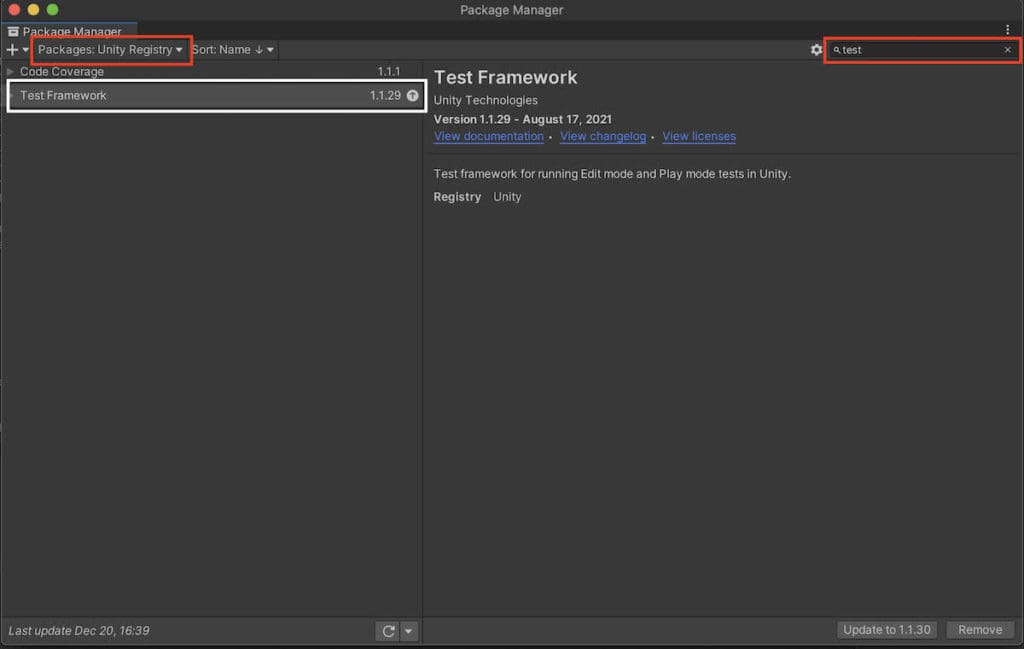
When you want to do unit testing in Unity, you can take advantage of user-friendly tools that are provided by the official Unity Test Framework package. This is a module created by the Unity team that gives you some neat debug interface and code shorthands to write C# unit tests easily. It is very easy to add it to your project — open the Unity package manager window, search for the Test Framework module, and click “Install” (or even just check that it is already installed).
Once it’s added to your project, you’ll see that you have a new option available under Window called Test Runner:

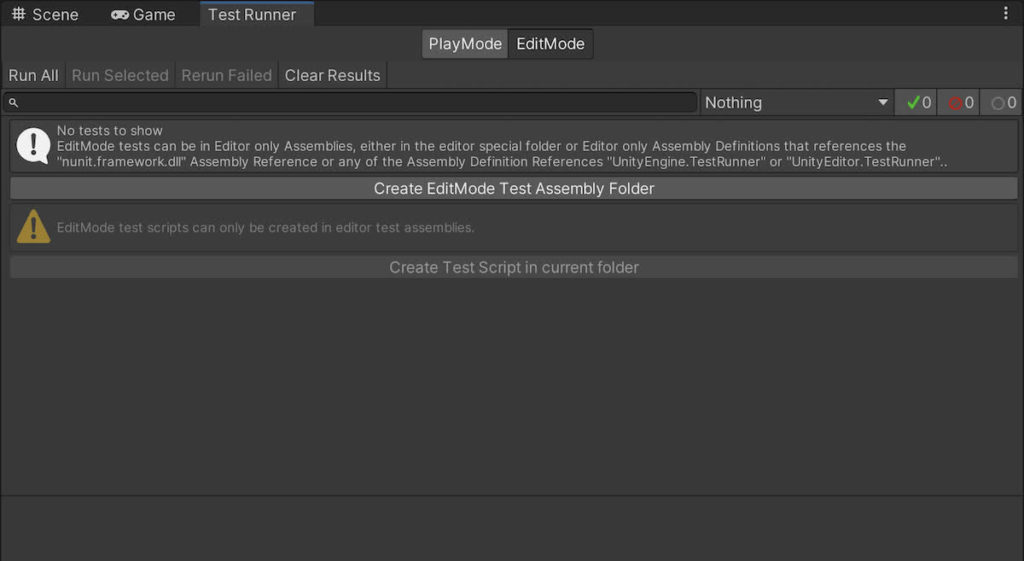
Creating test assemblies and test scripts in Unity
In this window, you can easily create new assemblies to group your tests together and get the right dependencies. Once you’ve created your assembly definition asset, you can also add a new C# test script with some example test cases by clicking on the “Create Test Script” button.
In my case, I will write all my tests in three test classes: BallTests, PaddleTests, and ScoreTests. Each class will have various “granular” test cases to check the different features.
To register a C# method for the test session, I just need to give it the Test method attribute (for a normal function) or the UnityTest method attribute (for a coroutine). The method should contain one or more assertions (using the Assert class) to actually run some tests.
The granularity (i.e., the number of assertions) in a single test case is up to you, but in general, the scope of each test case should be as limited as possible. For example, in my BallTests class, I will have just one test case that ensures the ball is properly respawned when I use my GameHandler.InitializeBall() function:
using NUnit.Framework;
using UnityEngine;

using Pong; // my game scripts namespace

namespace EditorTests
{

    public class BallTests
    {
        private GameHandler _handler = new GameHandler();

        [Test]
        public void ShouldInitializeBall()
        {
            GameObject ballObj = new GameObject();
            Rigidbody2D ball = ballObj.AddComponent<Rigidbody2D>();

            _handler.InitializeBall(ball);

            Assert.AreEqual(ball.transform.position, Vector3.zero);
            Assert.AreNotEqual(ball.velocity, Vector2.zero);
        }

    }

}
This test asserts that two things are true after the ball is reset: one, that the ball is in the middle of the screen, and two, that it has a non-null velocity.
The ScoreTests class differentiates between scoring for the left and right players — each situation is taken care of in its own test case:
using NUnit.Framework;

using Pong;

namespace EditorTests
{

    public class ScoreTests
    {
        private GameHandler _handler = new GameHandler();

        [Test]
        public void ShouldScoreLeft()
        {
            _handler.scoreLeft = 0;
            _handler.scoreRight = 0;

            _handler.ScorePoint(true);

            Assert.AreEqual(_handler.scoreLeft, 1);
            Assert.AreEqual(_handler.scoreRight, 0);
        }

        [Test]
        public void ShouldScoreRight()
        {
            _handler.scoreLeft = 0;
            _handler.scoreRight = 0;

            _handler.ScorePoint(false);

            Assert.AreEqual(_handler.scoreLeft, 0);
            Assert.AreEqual(_handler.scoreRight, 1);
        }

    }

}
But it’s the PaddleTests class that is really interesting!
The first test cases are just related to game initialization — I check that the paddles are properly instantiated, placed, and configured. But then, the following methods are coroutines (that use the UnityTest attribute) that simulate a small portion of time, during which I move a paddle.
Since the two paddles work exactly the same and only the input is different, I don’t discriminate between left and right and assume that I can test only one. I run four tests on the left paddle:
ShouldMovePaddleUp()andShouldMovePaddleDown()simply assert that theMoveUp()andMoveDown()functions do change the position of the paddle.- Then,
ShouldKeepPaddleBelowTop()andShouldKeepPaddleAboveBottom()assert that this movement is constrained to the camera bounds and doesn’t overshoot the top and bottom edges.
Apart from the assertions, these methods all follow the same logic: First, I increase the timeScale so that the test runs faster (this is basically like running your video game in quick mode); then, I simulate the situation I want; and finally, I reset the timeScale to its normal value of 1.
As an example, here is the first test case, ShouldMovePaddleUp():
using System.Collections;
using NUnit.Framework;
using UnityEngine;
using UnityEngine.TestTools;

using Pong;

namespace EditorTests
{

    public class PaddleTests
    {
        private GameHandler _handler = new GameHandler();

        // ...

        [UnityTest]
        public IEnumerator ShouldMovePaddleUp()
        {
            // increase timeScale to execute the test quickly
            Time.timeScale = 20f;

            (GameObject left, _) = _handler.CreatePaddles();
            PaddleManager pm = left.GetComponent<PaddleManager>();

            // move paddle up
            float startY = left.transform.position.y;
            float time = 0f;
            while (time < 1)
            {
                pm.MoveUp();
                time += Time.fixedDeltaTime;
                yield return null;
            }

            Assert.Greater(left.transform.position.y, startY);

            // reset timeScale
            Time.timeScale = 1f;
        }

        // ...

}
If you want to check out the other functions, you can take a look at the GitHub repo 🚀.
Running Unity via the console
First of all, we obviously can’t use Unity’s user interface to run checks programmatically and within an automated workflow. Instead, we need to rely on command-line execution of Unity to run our tests and integrate our unit testing phase into our CI/CD pipeline.
To better control the unit tests we run and the exit code, we’re going to write our own test running function and call it from the command line.
So let’s create a new Runner C# class next to our test scripts with the following code:
using UnityEditor;
using UnityEditor.TestTools.TestRunner.Api;
using UnityEngine;

public static class Runner
{
    private static TestRunnerApi _runner = null;

    private class MyCallbacks : ICallbacks
    {

        public void RunStarted(ITestAdaptor testsToRun)
        {}

        public void RunFinished(ITestResultAdaptor result)
        {
            _runner.UnregisterCallbacks(this);
            if (result.ResultState != "Passed")
            {
                Debug.Log("Tests failed :(");
                if (Application.isBatchMode)
                    EditorApplication.Exit(1);
            }
            else
            {
                Debug.Log("Tests passed :)");
                if (Application.isBatchMode)
                    EditorApplication.Exit(0);
            }
        }

        public void TestStarted(ITestAdaptor test)
        {}

        public void TestFinished(ITestResultAdaptor result)
        {}
    }

    public static void RunUnitTests()
    {
        _runner = ScriptableObject.CreateInstance<TestRunnerApi>();
        Filter filter = new Filter()
        {
            testMode = TestMode.EditMode
        };
        _runner.RegisterCallbacks(new MyCallbacks());
        _runner.Execute(new ExecutionSettings(filter));
    }
}
This uses the Unity Test Framework to run the tests programmatically and run a specific callback routine when all tests are finished.
Now, we can run it in the terminal by calling the Unity executable from the command line. The path is a bit different on Windows and Mac computers. Here is an example for an OS X system:
/Applications/Unity/Hub/Editor/2020.3.20f1/Unity.app -batchmode -projectPath /path/to/your/project -nographics -executeMethod Runner.RunUnitTests -logFile unit_test_logs.log
The first part of the command line is the path to the Unity executable; -batchmode and -nographics are here to run the editor in console mode without a user interface. The -executeMethod option will directly run our function, and the -logFile option will specify the path to the execution log’s output file.
Don’t forget to adapt the -projectPath option to your own Unity project path!

Setting up Codemagic CI/CD
The final step is to integrate this unit testing step inside a Codemagic workflow so that it is part of an automated CI/CD process.
Important note: For this step, you’ll also require a Pro Unity License — you’ll need to activate your license during the workflow for building and publishing to work properly. Previously, you would’ve also needed to contact Codemagic so that we could give you access to the special type of build machines with Unity, but this is no longer necessary, as Unity is preinstalled by default on Mac, Linux, and Windows build machines.
Codemagic relies on apps: Every project is an app that pulls the code from a remote repository (GitHub, GitLab, Bitbucket, or custom). Once you’ve created a Codemagic account, you can go to your dashboard to create and configure a new app:

First, you’ll need to link the Git repository you want to pull the project code from:

Then, you’ll be able to configure the app a bit more, particularly by adding some environment variables. This is a secure way to add sensitive data, such as credentials, without committing them to the Git repository!
As explained in the Codemagic docs for building Unity apps, you’ll need to define three environment variables: UNITY_SERIAL, UNITY_USERNAME, and UNITY_PASSWORD — make sure to add all of them to the unity group:

The next step is to add a C# build script to your project as Editor/Build.cs to build the project programmatically instead of manually clicking Build in the Build Settings panel:
using System.Linq;
using UnityEditor;
using UnityEngine;

public static class BuildScript
{

    [MenuItem("Build/Build Mac")]
    public static void BuildMac()
    {
        BuildPlayerOptions buildPlayerOptions = new BuildPlayerOptions();
        buildPlayerOptions.locationPathName = "mac/" + Application.productName + ".app";
        buildPlayerOptions.target = BuildTarget.StandaloneOSX;
        buildPlayerOptions.options = BuildOptions.None;
        buildPlayerOptions.scenes = GetScenes();

        Debug.Log("Building StandaloneOSX");
        BuildPipeline.BuildPlayer(buildPlayerOptions);
        Debug.Log("Built StandaloneOSX");
    }

    private static string[] GetScenes()
    {
        return (from scene in EditorBuildSettings.scenes where scene.enabled select scene.path).ToArray();
    }

}
Here, I’ve only defined the build for Macs, but the Codemagic docs show you some other platform build configurations.
One really nice thing about Codemagic is that you can actually do everything in the workflow definition file! This configuration is defined in the codemagic.yaml file that you put in the root of your project (next to the Assets/ main folder)! Because our workflow is pretty simple here, the idea is simply to chain a list of shell commands to execute the different steps of the CI/CD process, like this:
workflows:
  unity-mac-workflow:
      # Building Unity on macOS requires a special instance type that is available upon request
      name: Unity Mac Workflow
      environment:
        groups:
          # Add the group environment variables in the Codemagic UI (either in Application/Team variables) - https://docs.codemagic.io/variables/environment-variable-groups/
          - unity # <-- (Includes UNITY_SERIAL, UNITY_USERNAME, UNITY_PASSWORD)
        vars:
          UNITY_BIN: ${UNITY_HOME}/Contents/MacOS/Unity
      scripts:
        - name: Activate License
          script: $UNITY_BIN -batchmode -quit -logFile -serial ${UNITY_SERIAL?} -username ${UNITY_USERNAME?} -password ${UNITY_PASSWORD?}
        - name: Run Unit Tests
          script: $UNITY_BIN -batchmode -executeMethod Runner.RunUnitTests -logFile -nographics -projectPath .
        - name: Build
          script: $UNITY_BIN -batchmode -quit -logFile -projectPath . -executeMethod BuildScript.BuildMac -nographics
      artifacts:
        - "mac/UnitTestingPong.app"
      publishing:
        scripts:
          - name: Deactivate License
            script: $UNITY_BIN -batchmode -quit -returnlicense -nographics```
As you can see, in this file, we specify the execution steps, as well as the type of instance to run the workflow on, the environment variables to load, the artifacts to produce, etc.
The environment part lets us “inject” all the env vars we defined previously in our “unity” group, as well as some custom vars on the spot (like the UNITY_BIN). The scripts block defines the various steps of our workflow:
- First, we activate our Pro Unity License so that we have access to all the required tools.
- Then, we run the unit tests: If everything passes (i.e., if we have a 0 exit code), we continue on to the next step; otherwise, the workflow is interrupted immediately, and nothing is published.
- Then, we actually build the new version into an app and store it as an artifact of the build.
- And finally, we deactivate the license and perform some cleanup.
Before the cleanup, we can also add a step to publish to the stores, as explained here.
In the end, we’ll have produced a single artifact (see the artifacts block): the executable itself, our runnable Pong game.
Once you’ve committed and pushed all of this to your repository, simply go back to your Codemagic dashboard and start a build of your app, picking this workflow from the list:

You’ll see the different CI/CD steps on the right: First, the remote machine will initialize, then the code will be pulled from your repository, and then the steps from your codemagic.yaml configuration file will be executed.
If your workflow fails with a 1 exit code for some reason (for example, if the unit tests fail), the process will get interrupted:

Otherwise, the whole thing will run until the end and deploy your app automatically:

You can go to your Builds to check the various states of your workflow builds. Here, you’ll see the repository and commit each build uses as well the time it took to complete, and you’ll get a link to download the artifacts created by the workflow:

Conclusion
Ta-da! Thanks to Codemagic, we have now automated our Unity CI/CD process with unit testing to validate that our code is OK and doesn’t cause any regressions or bugs! Now you can go even further with test reporting or workflow scheduling…
I hope you enjoyed this tutorial — and of course, don’t hesitate to share your ideas for other DevOps topics you’d like me to make Unity tutorials on! You can find me on Codemagic’s Slack, on Medium, or on Twitter.
You can find the sample project for this tutorial along with the codemagic.yaml file on GitHub over here. 🚀
Mina Pêcheux is a freelance full-stack web & game developer. She’s also passionate about computer graphics, music, data science, and other topics! She runs her own blog. Alternatively, you can find her on Twitter.


