


Boost your productivity and learn why CI/CD (continuous integration & delivery) is something that you should use.
Your product ideas may be the greatest of all time, but without delivering well and delivering often, it may be extremely hard to keep up with the competition. In this article, we’ll show you how continuous integration and delivery can help you do that.
We cover the following topics:
- What is CI/CD?
- Key differences between Continuous Delivery and Deployment
- Continuous integration tools for mobile vs web. What’s the difference?
- Why should you use CI/CD for your next software project
- CI/CD tools for mobile apps
- 6 reasons why Codemagic should be your CI/CD provider for your mobile apps in 2021
- Codemagic CI/CD security measures
- Testing with Codemagic CI/CD tool
- Top 12 configuration mistakes that will fail your mobile CI build
What is CI/CD?
Your product ideas may be the greatest of all time, but without delivering well and delivering often, it may be extremely hard to keep up with the competition.
Let’s first take a look at:
- What is continuous integration and delivery (CI/CD)
- What is Continuous deployment
- What’s the differences of mobile CI/CD and web CI/CD
- What are the key differences between continuous delivery and deployment
- How to set up a CI/CD pipeline
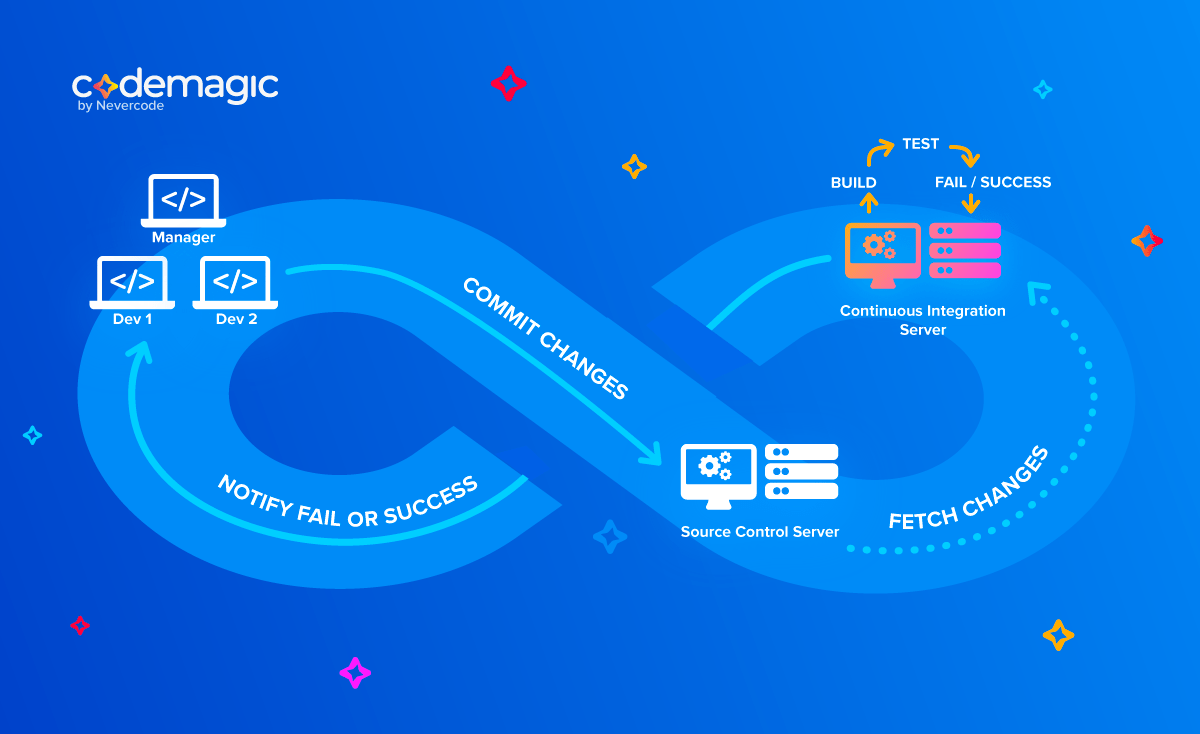
What is Continuous Integration (CI)
Continuous Integration is the process of merging the code of all developers into a main source code, so that developers can find and fix the issues as soon as possible. The popular scientist Martin Fowler defined continuous integration as follows:
“Continuous Integration doesn’t get rid of bugs, but it does make them dramatically easier to find and remove."
The main goal of CI is to provide faster feedback and speed up the development process. Fixing bugs early on is cheaper than putting it off till it’s too late.
The term continuous integration was first coined in 1994 by Grady Booch and used in extreme programming practices later. The first ever continuous integration tool was CruiseControl. Since then, CI servers have evolved with time and many companies have started to provide CI services.

A continuous integration server performs following things:
- gets access to the Source Code Control, e.g GitHub, and checks out the code on the server;
- performs static analysis on the code to detect syntax related issues;
- Builds and compiles the app using the source code;
- Runs the different flavours of the tests;
- Team fixes the issues as soon they are found by the server.
CI practices include the build automation, self-testing and faster builds.
Continuous Integration: Needs and Benefits
The most obvious need for continuous integration to successfully operate is the existence of automated tests. Your QA team needs to write automated tests for all of the improvements and new features that you are working on.
In order for the automated tests to run properly on every new commit that’s pushed, you also need a continuous integration server that monitors the main repository and runs the tests.
And as already noted, proper continuous integration demands that your developers are merging their changes as often as possible.
The immediate benefits of implementing continuous integration are the following:
- Fewer bugs making it to production
- Faster turnaround time for fixing bugs
- Less time and money spent on testing
What is Continuous Delivery (CD)
Continuous delivery (CD) is an extension to continuous integration where the working software can be released to the end users at any time. The process of continuous delivery adds extra steps to the above mentioned CI process, which are:
- Packaging application;
- Code Sign (if needed);
- Deploying the application to specific environments.
With continuous delivery the software teams can achieve fully automated, low risk, and low cost releases. This process enables one click deployment where you can get the releasable build whenever needed. However, manual intervention is always required to deploy the software to production. In continuous deployment, there is no manual intervention, the committed code reaches production straightaway.
The combination of CI and CD processes forms the CI/CD pipeline.
What is Continuous Deployment (CD)
Continuous deployment (CD) takes the entire process of continuous delivery a step further by releasing every change that passes through the production pipeline directly to your clients. If an automated test fails, then the change will not be sent, but if everything checks out in testing, the changes are deployed automatically.

Continuous deployment is a software release process that focuses first and foremost on automation. During this process, automated testing is used in order to confirm and validate the changes that have previously been made to the code by the development team. The continuous deployment process serves to confirm the fact that the newly written code is stable and can be immediately deployed to production.
It’s a stark contrast to the “old” way of development in which code would travel from one machine to another in order to be tested and then deployed by a person. Compared to that method, continuous deployment is much less error-prone and doesn’t require nearly as many resources to function properly.
The main purpose of continuous deployment is to increase the speed at which you are getting feedback from your customers and clients and responding to that feedback.
Key differences between Continuous Delivery and Deployment
The fact that they share an abbreviation (CD) certainly doesn’t help people to understand what the difference between continuous delivery and continuous deployment is, but thankfully, the explanation is fairly clean-cut.
Even though they have similar responsibilities in the software development process, delivery always comes before deployment, meaning that there is always a final, manual approval step in continuous delivery before the code is released in production.
To understand the difference more easily, think about the process in terms of receiving an item that was delivered to your home from an online shop. The delivery process is the process during which you are coordinating the delivery of the item by entering your address and confirming when you want your item delivered.
Once the package arrives you will inspect it. If you’re happy with it, you can start using it. That’s deployment. If you are not happy with the item, you can reject it and send it back. This can be compared to your code failing an automated test, which means that it would be sent back to your developers instead of being deployed to your clients so that they can start taking advantage of the changes right away.
This means that continuous deployment represents the full, complete, end-to-end development pipeline. And the main difference between continuous deployment and delivery is that releases happen automatically in continuous deployment if all criteria for the release are met through testing.
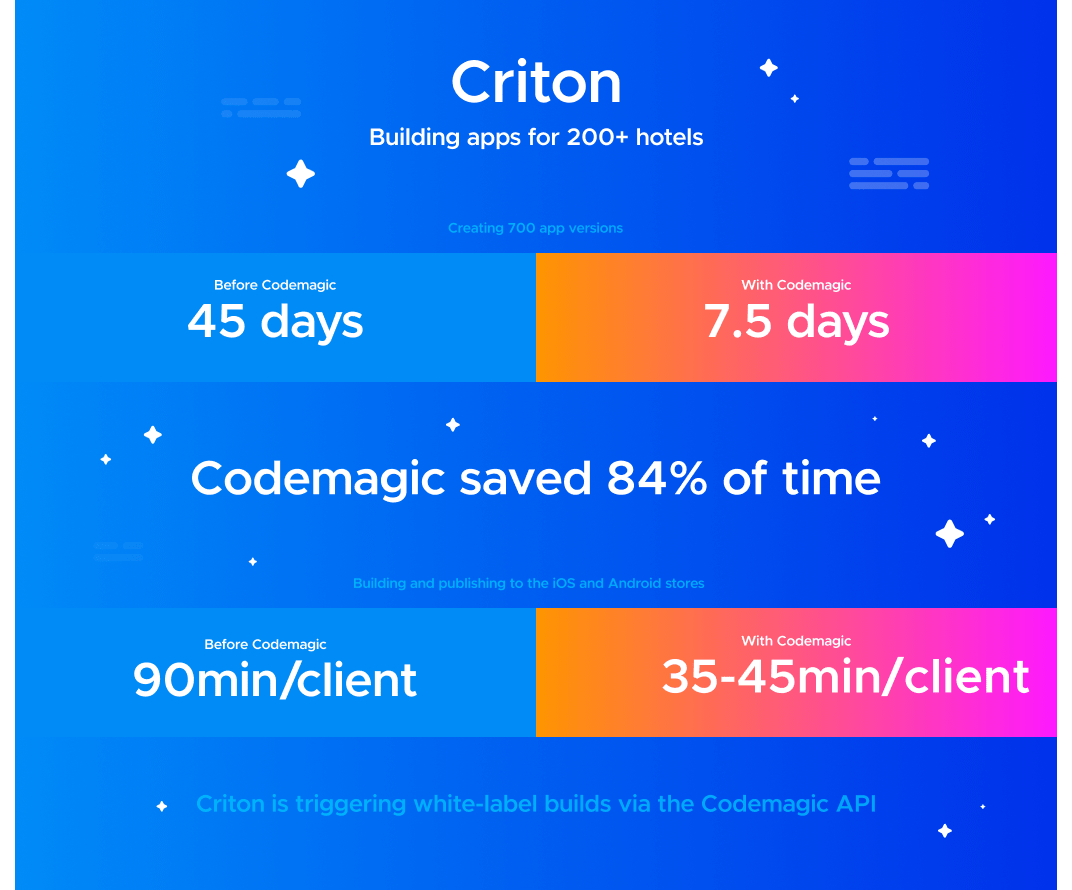
Here’s how much time Criton is saving with a CI/CD tool. You can read their case study here.
Continuous Delivery: Needs and Benefits
Continuous delivery cannot happen if your team doesn’t already have a strong foundation in continuous integration and a well-developed, automated testing process installed.
In this phase, automating your deployments is imperative as well. In continuous delivery, the trigger is still manual, but the process itself should be automated once it is set into motion.
The immediate benefits of implementing continuous integration are the following:
- The process of preparing for deployment is significantly minimized
- You are able to release code into production more often
- The feedback loop between you and your clients shrinks
Continuous Deployment: Needs and Benefits
In continuous deployment, even the release is completely automated. That means that your testing process needs to be almost perfect. The better your automated tests are, the cleaner your releases will be.
It will also be important to make sure that your documentation of the releases is able to keep pace with the rate at which you are deploying.
The immediate benefits of implementing continuous integration are the following:
- Development is an ongoing, continuous, and faster process because you no longer have to stop developing in order to release new code into production
- You’re less likely to see bugs and the ones you do find will be easier to fix
- Your customers are able to see steady progress in your product since you are delivering new features, bug fixes, and other improvements on a regular and constant basis
Continuous integration tools for mobile vs web. What’s the difference?
People often underestimate the complexity of the mobile ecosystem. Mobile brings with it a whole set of unique challenges that make implementing CI for it difficult. Continuous integration as a practice is nothing new to developers building web apps; however, when you’re developing mobile apps, you’ll learn that CI/CD tailored specifically for mobile has a lot to offer to the process. While the CI concept remains the same, its practicalities are somewhat different.
So, let’s dig into what makes building mobile apps so different from web apps? Secondly, why you really need to implement a continuous integration tool tailored for mobile to build kick-ass applications… FAST!
Continuous integration for Mobile Apps vs Web Apps
The foundational building blocks and the workflow of the continuous integration process for mobile mirror those of web app development: you write code, commit, push, then watch the CI service fetch your repo, install dependencies, build your app and test it. And this is where the challenges pop in.
Testing Mobile Apps vs Web Apps
It’s never too early to begin testing an application. If the end-user perceives bad performance from your app, their next click will likely be on your competitors. While all types of performance, QA, and functional tests as well as non-functional tests, such as UX testing, are the same for mobile and web, running functional tests on a mobile application requires the use of an emulator/simulator or a physical device.
Simulators/emulators: Virtual environments can save you lots of time and money by expanding your testing coverage to multiple devices, so you can be more confident to deliver code that works on (almost) all the devices.
Real devices: The vast variety of mobile devices, all with their own specifics, can outperform the emulator/simulator in terms of bug detection, which is why you’ll need to test on physical handsets to reveal device-specific bugs. With a cloud-based device lab like Firebase Test Lab for Android or Amazon Web Services (AWS) Device Farm, you can run tests and interact with a large selection of physical devices without actually having to invest in their ownership or setup.
The next step for a web app would be to deploy the application to a hosting service, making the new version of the web application immediately available to the public. And again, this is not how things work for mobile apps!
Distributing Mobile Apps vs Web Apps
The difference at the deployment stage comes down to the distribution model. In many ways, mobile apps take us back to the days of shipping shrink-wrapped CDs for each new version of our software. A single copy of your web application is the only thing needed to make it available to the entire world. By contrast, hundreds, thousands and (hopefully) millions of copies of your mobile app will need to be delivered to users’ phones. And while you have full control of the deployment pipeline for your web app, someone else is in charge of the mobile distribution channels and you have to be ready to play by their rules.
To begin with, all mobile platforms have a set of guidelines to which all apps must adhere to be accepted into the official stores. For example, you can take a look at Google’s. Apple goes a step further and requires your app’s code to be signed. For this purpose, you will need to obtain a digital certificate and a provisioning profile from Apple.
Once your app meets all the necessary requirements of one or multiple mobile platforms, the next step is to get it into Apple’s and Google’s walled gardens. While using a mobile CI service, such as Codemagic cannot shortcut this, it can make things significantly less painful by automating the key steps. Once a build completes successfully, mobile-focused CI service can automatically publish your build artifacts — i.e. distribution packages for Android and/or iOS — to the relevant channels. For instance, you can set up the CI tool to send your successful release builds directly to iTunes Connect —- Apple’s pipeline for submitting apps to the App Store.
Beta Testing
In addition to the release channels described above, you may wish to publish your builds elsewhere. Most web developers are familiar with the concept of environments — “dev” for development work, “staging” for testing by a small group of users or a client, and “master” for wide distribution to the public. The same concepts apply to mobile app development. It’s only the “master” branch of your project that you’ll want to submit to Apple or Google. Before that, you’ll want to have the beta version of the app evaluated by your teammates or — if you have them — dedicated beta-testers. The simplest by far is to configure the CI tool to distribute the app via email to the addresses you provide.
While this is very straight-forward, you can get a lot more out of your beta testers if you connect with them via a third party, such as HockeyApp, Crashlytics, or TestFairy. These services will not only help you with distribution but can also monitor crashes, provide detailed reports, and collect user feedback. Here, too, many CI tools for mobile, have your back with optional automatic publishing to all three.
Supporting Legacy Code
Once again, it feels like we’re going back in time. “Fragmentation” was not a concept that applied to web applications, but mobile brings it roaring back. Just because an awesome new version of your app is available, there is no reason to expect your entire user base to install it ASAP. (But you won’t have to wait too long before seeing their 1-star reviews pour in!)
Having to do upgrade testing and supporting multiple versions of your software simultaneously is not an easy task no matter how you slice it. Luckily, a good mobile-oriented CI service can help here by keeping a reliable version record of the binaries it builds. You can then use these as a reference when handling user issues.
Do you still think Jenkins, will do the job?
Continuous integration tools for mobile vs web. Wrap-Up
Here’s a quick summary of the key differences between web and mobile CI you should be aware of before getting started:
| CI for web CI for mobile | CI/CD for web | CI/CD for mobile |
|---|---|---|
| Testing | Testing Functional tests do not require extra action. | Functional tests require the use of an emulator/simulator or a physical device. |
| Deployment | Deploy to live instantly, no code signing | Submit to store for approval, May need to upload certificates to CI |
| Beta Testing | Deploy to staging and invite users | Distribute build via email or 3rd party |
| Legacy Version Support | N/A: newest version instantly available for all. | Use CI to keep track of binaries versions for reference |
The only right way to compete in today’s mobile-first world is to adopt the best tools for mobile app development. You will undoubtedly discover that a continuous integration service tailored for mobile development is a needed tool.
The real power of CI for mobile application lies in automating the mundane and error-prone tasks, thereby letting you spend more time doing what you love — writing the code. As with any tool, a proper understanding of how CI works within a particular setup is critical for getting the most out of it without undue effort and frustration.
Try Codemagic CI/CD for Flutter, React Native, iOS and Android now.
But why would you even use CI/CD for your next software project?!
With so many new software quality processes released in the last few years, how can you know if implementing Continuous Integration and Continuous Delivery is worth it for your apps? In the following part Lewis Cianci looks at some of the use cases, and some of the reasons why it might be worth your time.

As a software developer, I think we can agree that we have seen an incredible amount of change over the last five years. In these new technologies and methodologies, there’s simply not enough time to decide if something is right for you, or your software development needs. So, everything runs the risk of fading into background noise.
One of these things is the rise of Continuous Integration/Continuous Deployment (CI/CD) tooling in this time.
The value in CI/CD
There’s a saying in the advertising world, that goes something like this: Advertising shouldn’t ever cost you money. The meaning of it is that if you have an advertising campaign for your product or service, and you pay money for that campaign, you should attract more than that amount of money in sales for your product or service. After all, if you don’t, then what are you paying for? To make the advertising company rich?😌
Anything you adopt in your development pipeline should more or less follow the same principle. It shouldn’t add a cost, whatever it may be (increase in build time, more licensing fees, etc) without ultimately saving you more in time, or money, then if you didn’t have that particular thing. That’s essentially the pitch of any piece of software, or service that you purchase today.
So CI/CD offers to make us more efficient software developers. How?
To answer this question, let’s look at how someone might develop an application without a CI/CD solution.
Click, wait, click, wait, a life without CI/CD
Let’s take a trivial web application as an example. This trivial example will be called Pictures of Cats. There are two components in this example.
Web Server: Written in ASP .NET Core and C#, featuring an API where people can download a random picture of a cat, and people can favourite a particular picture of a cat. Every night the web server runs a scheduled task to aggregate the cats that were favourited that day and emails a report to people on a subscription list with the “cat stats” for that day.
Client App: We’re not messing around with this app, we’ve decided that just a website or even a Single Page App won’t be performant enough for this app, no, we need a native experience! Our cats deserve the best. So we have a phone app written in Flutter that queries the web server shown above for a picture of a cat. It can also show a leader board, etc.
That’s our million dollar idea. And if we strike out, we still get to look at pictures of cats, so that’s gotta be worth it, right?

What we would normally do
So, we’d spec out a website to perform that function, set up a database to store users details and logins (securely! of course). And then make a phone app. And we’re done!
But we’ve lost in two key areas.
Running the build process manually
Every time we make an update for our app, we’ll have to carry out the following steps manually.
- Build the app in release mode for iOS and Android
- Increment the Android version number (otherwise, the store will reject it because there’s already an app bundle/apk with the same version uploaded)
- Increment the iOS bundle version (for the same reason as above)
- Go to the Play Console
- Upload APK/App Bundle
- Fill out required fields (what’s new in this version etc) *
- Send the APK to the appropriate release channel
- Open XCode
- Publish app to App Store Connect from xcode
- Complete the app encryption question to get your app released to Testflight *
* you’d have to do this in some capacity in a CI/CD solution, but it can be automated.
So, that’s okay for our first app. But we have to release updates in the future. Doing the above steps over and over again will get tedious. Plus, we’re manually managing the version code for our app with each deployment. If we get the versions wrong per deployment, this can make troubleshooting difficult in the future, especially if your iOS and Android releases are different versions for no good reason.
Also! We went straight from building our app to deploying it. We didn’t write tests, or use any tests to ensure quality! Let’s take a minute to think about what this means.
Every app we create exists to solve a problem. But how do we know that our app actually works? If your answer is that you know it works because you don’t get many crash reports, then aren’t you effectively using your users as testers?
Anyway, back to our super exciting app release.
We release Pictures of Cats v1.0 to the store…
…and it goes viral. There’s a surprising amount of money in this catatonic app idea. This increased influx of users bring with them a wide variety of devices, countries and bugs.
Simple things, like a change of timezone, could introduce an issue where comments on the cat photos are out by a few hours. Or literally anything could happen in our app because we haven’t written any tests.
Fixing our first bug
An issue crops up. People are using the app and the times are all over the place. Pretty quickly it becomes apparent that the reason for this is because DateTime’s are being shown in their UTC format, not a local time based on where the user is. We would check who it was affecting, and then try to work out a fix. This bug report process isn’t as polite as lovely emails from users coming into your inbox, no, it’s usually more like one star Google Play reviews (“rubbish app! can’t even get the time of when a cat was uploaded correct! 1 star…”. Or something like that. You get the drift.)
We track it down to how our JSON is being deserialised, and we change our JSON de/serialising configuration in this instance, and re-run our tests to validate that we haven’t broken anything else. Ah, wait, those tests…

We’ll get around to writing them one day. For now, let’s just shake it down lightly by using the app and confirming that everything looks okay. That’ll do, right? Plus, you’re on a timeframe! People are using your app and it’s not working which is unacceptable.
Once you’re happy with this you’d push it out to your beta channel, and then onto production as well.
Little do we know though, by changing how our DateTime’s are de/serialised, we’ve introduced another bug. You didn’t have any tests to validate this use case. So when the client tries to retrieve the DateTime value from another source, the conversion fails, or the time is wrong.
This sounds like a pretty unlikely bug to run in to I know that, but you’d be surprised the amount of times something like DateTime’s can make you come unstuck. It’s unlikely that it would have a huge impact on the Pictures of Cats app, but another app I wrote had resources that could be booked. For example, someone would log into it and book a resource for use, at a certain time of day.
It’s simple, right? Everything worked fine locally. Then I deployed it to Azure onto a server on the cheapest instance available. Of course, it was a different time zone to where I was in the world.
Then the reports started coming in. People booking the resources noted a weird issue. When they booked a resource, it would actually put the booking in for 10 hours in the past. 10 am bookings became 2 am bookings. And so on.
In my personal experience, fixing issues without a solid test foundation is just as likely to introduce more bugs, potentially even worse than the one you were trying to fix in the first place.
So what now?
We’ve inadvertently introduced a bug into our app, and we’ve deployed it. Reports of issues start trickling in in the form of one star reviews, emails from our customers, etc. If you have Crashlytics or Sentry.io set up, you might get some good stack traces to help you work out the issue. But then, the amount of effort involved in fixing the is still pretty big. You have to patch the issue, build for iOS, build for Android, and then deploy it and get past the store approval process. By that time, people may have uninstalled your app, and especially if it is paid or had In-App Purchases (IAP), you may have some trust issues with the quality of your apps.
Now you’re just kind of caught in the never-ending process of bug whack-a-mole, fixing issues and potentially introducing more as you go along. You have no time - every time another issue pops up you gain more one star reviews. It’s not a good outcome. You still have no tests, you still have no way of answering the question “How do I know my app works?"
What went wrong?
In the above example, we made a mistake with our initial implementation. This isn’t actually the main issue though - mistakes happen all the time and it’s how we become better developers.
The main issue is that we didn’t test our change thoroughly enough, and we didn’t have a good CI/CD solution to rely on to avoid these kinds of issues. We would have had a much better chance of avoiding the above situation had we implemented a CI/CD workflow.
Continuous Integration
The destination for Continuous Integration is to simply find an automated way to build, test, and then package those applications.
Continuous Deployment
This essentially takes the output of the above process and makes it available to the people who should have it (your customers, testers, etc).
Let’s have a do-over
So, let’s re-visit the idea above, but this time, we’re going to use our CI/CD solution. We’ll have to spend more time before deploying the app to get our CI/CD setup working correctly, but let’s see if this investment pays off.
We write our app again. It’s the same thing, same app, same amount of cats. But this time we follow an aspect of Test Driven Design, and instead of just sitting down and penning the UI and business logic from scratch, we actually write tests first, and then write the code that satisfies these tests.
That might sound like a roundabout way of doing things, but consider for a moment. Your getCats() function in your provider/service will always return a list of cats. Your getCatsRanked() will always return a list of cats, ordered from high to low. So your test cases just assert what you yourself already know, that these functions will return these types of data. This way, as you build out your app, your test suite grows with it. Instead of getting all the way to the end and trying to write the unit tests then, you build tests as you add functionality.
In Dart, these are just unit tests, for testing the services in your app. You could write a unit test to assert that a List has cats in it, and that the counter is always reverse descending order. And then you could write a widget test to ensure that they are laid out in the correct order, by checking the text value of a constructed Text field. All of this you can accomplish without even so much as starting an emulator.
We have a well tested, high quality app now. Let’s plug it into our CI/CD solution.
Connecting it to Codemagic
I know what you’re thinking. Ugh, of course, you’re connecting it to Codemagic. I’m on the Codemagic blog, what did I expect.
Are you just a paid shill, recommending Codemagic for my CI/CD solution?
I mean, it would make sense. You’re on the Codemagic blog, reading about Codemagic CI/CD, and here I am, you guessed it, recommending you to use Codemagic.
Before I started contributing articles for Codemagic’s blog, I chose them as my CI/CD provider for my apps. The reasons why I did this are still completely valid today. If I had experienced a better Flutter CI/CD build solution than Codemagic I would recommend them instead, but Codemagic is the easiest, most straightforward CI/CD provider I have found for Flutter. If I thought someone else was better I would write about them instead (but it might make things awkward for me and the people that run this blog…)
Plus, it does cool things. You can deploy your app to web by checking a box in the deployment pipeline, and it just works.
– Lewis Cianci
You can put your apps up for free, and their standard build pipeline will run tests on your Flutter app. If the tests fail, your app won’t deploy to the stores. If they pass, you can configure it to only deploy to your pre-approved list of testers. Neat, huh?
>> Read more about getting started with Codemagic CI/CD for Flutter
The initial scenario, but with tests and CI/CD
You push your build, Codemagic runs the build, and then afterwards, runs your tests for your app. Codemagic automatically increments the version for our Play Store and iOS versions, so they are kept in sync automatically. So our crash reports and other reporting makes sense as both of our app versions are the same between platforms.
Also, the handy repository of tests that we have built up over time are run against our latest build. If any of our tests fail, then the app doesn’t get deployed to the testers. Instead, we just get a report telling us what tests have failed, for us to action.
However we choose to build this out is completely up to us. We could use codemagic.yaml to trigger the deployment of our environment on a remote Azure instance, so we can instantiate a test instance of our web app for our test phone app to connect to, and then run full end-to-end integration tests. The complexity of this will grow as the complexity as your app itself grows.
If you don’t want to go all-in with a CI/CD provider like Codemagic today, or you think you might in the future, that’s perfectly fine too. One of the main tenants of DevOps (used as a buzzword far too frequently) is to automate as much stuff as you can. You can use tools like fastlane to build, test, and release your apps locally from your computer before committing to a CI/CD provider. Whatever you learn in that process will benefit you later.
Using CI/CD creates a safer, more reliable development experience. Writing tests and implementing a CI/CD provider does take time initially, but in almost all cases, you gain this time back by simply knowing that your app works as you expect. And after all, the last thing you want is to be up at night worrying about your Pictures of Cats app 🐱
CI/CD tools for mobile apps
There are some CI/CD tools available on the market for mobile apps. The CI/CD tools can be of two types.
Self-hosted
The self-hosted CI/CD solutions require owning hardware, e.g macOS machines or Linux servers. The process of setting up CI/CD pipelines can take longer and the maintenance of both hardware and software packages is always required for the in-house CI/CD tools. Some examples of the Self-hosted CI/CD tools are Jenkins, TeamCity, BuildKite, etc.
Cloud-based
Cloud-based CI/CD tools are easy to set up and all the hardware and software packages are managed in the cloud. As most of the complex tasks, like code signing and publishing, are being handled in the cloud, it requires less maintenance and developers can concentrate on building the business features. Some cloud-based CI/CD tools include Nevercode, Bitrise, Travis CI, Circle CI, etc.
Why does Flutter require dedicated CI?
Flutter is a cross-platform mobile app development framework from Google which allows us to write both iOS and Android source code with the same source code.
Smooth and automatic deployment
Flutter apps look almost like native apps because of the widgets. However, the process of deploying Flutter apps can be time consuming. Flutter documentation has a cool guide on deploying iOS and Android apps but there are many manual steps needed to be followed in order to release Flutter apps. It would be great to automate the whole Flutter app distribution process using a convenient tool with great user interface. Flutter apps could be deployed automatically if developers made deployable code changes.
Painless code signing
Flutter apps still require code signing for both Android and iOS apps. There are ways to script the code signing tasks, but usually it requires a lot of effort in writing and maintaining the scripts.
Easily downloadable build artifacts
Flutter CI/CD pipeline generates the build artifacts, however there are extra steps involved if we want to download the build artifacts generated by the CI/CD tool. It would be great if the CI/CD tool were able to provide the mechanism for easy downloading of the builds on devices.
How to set up a CI/CD pipeline for Flutter apps?
In order to set up CI/CD pipelines, it’s essential to know the underlying command line tools to automate the common tasks. In the case of mobile apps, CI/CD pipelines are a bit complex and require extra steps, like code signing and publishing to the Apple App Store or Google Play Store. Mobile CI/CD pipelines require build automation tools. A couple of widely used build automation tools are Fastlane and Gradle for iOS and Android respectively. Let’s explore how to automate a CI/CD pipeline for mobile apps
Automating static analysis
Static code analysis is the process of finding syntax and coding style related issues. There are various tools available for every language to detect the syntax and coding style issues. These tools are also called linter. While developing mobile apps, we need to choose the correct linter tool to perform the coding style checks.
When building Flutter apps, we need to use the linter for the Dart programming language. The static analyzer is one that can be used for linting the Dart code. While setting up CI/CD pipelines, static code analysis should be the absolute first step in the build process, so that we can fail the build early if there are serious coding errors.
Automating the build process
Once the linter step is passed, we can move on to the building and compiling of the source code. Building mobile apps requires compiling the source code, resources and other app-related data. The end result of the app building process should be generating the build artifacts. In the case of iOS, it should be a app/.ipa file and in the case of Android a apk file. When setting up CI/CD pipelines, we should use relevant tools to build the mobile apps. In the case of Flutter apps, we need to use the flutter build command with various parameters, e.g for building iOS and Android versions of the Flutter apps:
$ flutter build ios –release
$ flutter build apk –release
The build step should generate the build artifacts for the mobile apps.
Automated testing/code coverage
Automated testing is an integral part of CI/CD pipelines. Without automated tests CI/CD pipelines will lack quality checks which are important in order for the app to be released. Automated tests can be written for various levels. There are some lightweight tests like unit, integration, API tests, and there are long-running tests like UI tests which are very useful but require maintenance. The code coverage part should also be considered while setting up CI/CD pipelines. This will give some insights on how much code is covered by the tests.
With Flutter apps there is great support for automated testing for all levels. We can also write Widget tests for testing widgets. We can execute the flutter tests using the following command:
flutter test
The testing phase in a CI/CD pipeline gives you confidence that app functionality hasn’t been broken with the latest code changes.
Code signing and publishing
While setting up CI/CD pipelines for mobile apps, we need to consider code signing. The code signing process is a bit complex to understand as it requires some assets to be generated before we code sign an actual app, e.g Certificate, Profiles, etc. We have written an article covering the basics of code signing for mobile apps.
Once the app is code signed, it needs to be published in Apple App Store or Android Play Store or some third-party beta testing services. The CI/CD process should have the ability to publish the app on any platform configured by the user.
Automating notifications
Once the build is finished, it’s important to send a notification to the team with the status of the build and artifacts. The developers can always check the logs but it would be convenient to send the notification in terms of email, Slack or a similar notification service. The CI/CD pipeline should trigger this notification at the end of the build.
6 reasons why Codemagic should be your CI/CD provider for your mobile apps in 2021
Perhaps you’re on the fence about using a CI/CD provider, or you’re not sure if you want to introduce extra complexity into your project. Maybe you’re attached to your PowerShell or bash scripts that run your builds for you, which you manually upload to the Play Store and the App Store, respectively. If that’s the case, then you owe it to yourself to at least explore the potential time savings that a CI/CD provider can provide. When you hit that point, you’ll come to realize that there is no shortage of options in this space, and let me tell you, the sheer amount of providers offering free CI/CD solutions is impressive. There’s never been a better time to automate your build and deployment pipeline, friend.
As we’ve covered already, you’re likely reading this on the Codemagic blog, so it’s fairly obvious that I’ll be demonstrating the benefits of Codemagic. But to point to a CI/CD provider and say, “That’s the best one,” in a market saturated with options, you have to back those kinds of statements up. So let’s see what makes it so good.
Codemagic is more than just Flutter
When Codemagic first launched, its purpose was exclusively to build Flutter apps. As a Flutter developer, this personally suited me just fine 😅, but it obviously limited the usefulness of the solution to other developers who used frameworks like React Native or even built apps natively.
These days, Codemagic supports building for Flutter, React Native, Ionic and Cordova, as well as Native Android and Native iOS. Still, even if you are using something totally different, you can configure the pipeline to build your app using your framework of choice through the YAML pipeline. However, since support for frameworks has expanded considerably, does that mean that the complexity has increased too?
Surprisingly, this isn’t the case. For example, the guide on how to build a native Android app is quite short. It’s not some incredibly complicated system that you have to set up. In fact, in most cases, it’s enough to copy the samples, replace the bits that you need to and then start running your builds in the cloud.
It’s also worth considering that when your build needs to be run, the build agent already has everything on it to carry out your build, like the right version of the Android Build Tools and Xcode, so you don’t have to manually install these in a build step. This alone will save you a ton of time.
CI/CD that has great access to the build machines
Sometimes, when you run your app builds through CI/CD on a build machine that is somewhere in the world, when your build fails, it can be hard to diagnose what went wrong and what you can do to fix it. This usually means tweaking some configuration in your pipeline or in your code and then just re-running the build either until it works or until you go crazy. 🤩

This is an area where Codemagic really shines. Instead of getting stuck in this change, test and deploy loop over and over again, you can tell the build agent to stick around after your build has completed (successfully or otherwise. Then, you can either SSH or VNC into the build machine and see what went wrong.
This access to the build machines lends itself to other usages as well. As the macOS build agents are essentially just Mac minis with internet access and Xcode installed, you can also use these sessions to get set up for creating iOS deployments (e.g., creating your personal key). Don’t get me wrong – you shouldn’t expect this to be an incredibly quick experience if that is what you’re using it for. (After all, there are literally thousands of builds running at the same as you’re doing this, which could make your session feel a little slow.) But compared to not being able to do it at all if you didn’t own a Mac, the fact that the session can run a little slow is not such a big deal. In context, this basically means that Codemagic is letting you use their build agents through a remote VNC session, which is pretty amazing, potentially saving you from having to physically own a Mac in your early days (which would literally save you thousands and is great if you are still starting out).
Scalable CI/CD solution
In reality, you’ve probably wired up a CI/CD provider because you’re tired of running the builds yourself on your computer. That makes sense. Maybe you’ve started to do it because you’ve come to realize how much time building your apps is taking, or maybe you’ve gone the CI/CD route because you just want to automate as much of your build process as possible.
Whatever the case may be, while it’s true that every app may start small, some apps do go on to become quite large and have quite an impact. With that in mind, Codemagic still offers 500 minutes of build time for free to all individuals using their service. Codemagic doesn’t require payment up front or even a credit card, so you can get started without accidentally incurring a cost. If your build minutes are used up, your builds just stop running until the new month rolls around and your 500 minutes fill back up again.
To me, as a developer, this feels like the best of both worlds. If my app isn’t really that popular and it’s not making any money, I can probably get away with the included build time and not incur any extra costs myself. Then again, if my app gets really popular, I can purchase some more build minutes or run my builds on a Mac Pro so that they complete faster. The pricing structure for this is straightforward and easy to understand, billed on a per-minute basis, so the flexibility that this affords me is much appreciated.
Great support
What kind of support would you expect to receive for a free CI/CD solution? Personally, I would expect nothing, because how can I pay zero dollars for something and receive any level of support from a company who has to pay their employees to support me?
And yet, somehow, Codemagic has a pretty great support channel on Slack, where you can ask questions and receive support. If your build fails, even if you are a completely free user, you can still ask questions and receive guidance from the Codemagic team. One thing that I personally find impressive is that Martin Jeret, the CEO of Codemagic, is actually in these Slack channels as well and frequently replies to users (even people on the free tier). As far as I’m aware, this is actually fairly unique, and I’m not aware of any other CI/CD provider that has their CEO in their Slack channel. 🙋♂️ This makes me feel like they are confident in their product and in their support.
But it’s just support for Codemagic, right?
Well, not actually. There are also channels dedicated to development support, with over 3000 members in them. So you can get a level of support for your code and your CI/CD solution all in one place.
CI/CD that works, wherever you are
Whether you are starting builds from your desktop computer or you’re on the move and starting them from your phone, Codemagic remains completely functional no matter what device you are using. This point may sound superfluous; after all, websites working on your phone is a functionality that you would expect from any service that you use today. However, with at least one other provider, you can’t even start builds easily while you are on your phone.
In reality, constraining the times that you can start your builds to when you are sitting in front of a physical computer just doesn’t make sense. You might have had just enough time to push your changes into your repository, and you’d like to start your build at a later point in the day. On Codemagic, that’s something you can achieve quite easily.
They’re staying with the times
I would have thought that having a data center full of Mac minis that you’re letting strangers on the internet build their code on would be enough, but apparently, there’s still more to be done. In the not-too-distant future, the Mac mini build machines will benefit from Apple’s upgrade to the M1 processor, which simply means faster builds for you. It’s always great to see your CI/CD provider of choice staying up to date as technology progresses, so you’re not stuck with old tools at an inopportune time.
So, what did we learn about Codemagic CI/CD tool?
Codemagic is a pretty sweet offering for your CI/CD needs and deserves a serious look if you are in the market for a CI/CD provider because:
- It’s free to get started 💸
- You can use it for pretty much whatever framework you have 🛠
- It scales with you and has transparent pricing if you need to upgrade ⬆
- You get great support even if you are on the free tier 💁♂️
- They’re interested in keeping their tech up to date 🤖
Want to dive in and see how good it is for yourself? Make a new account and give it a go. If you have any questions, come and see how helpful the support can be for yourself. Perhaps you could even take some time over the end-of-year holidays to automate your builds – you know, like you’ve been meaning to for quite some time now. 😅 Be sure to let us know how you’re getting on in the Slack channel.

But what about the Codemagic CI/CD and security?
Security is one of the top priorities for almost all organizations. Any security breach can cause huge damage to the business, including loss of trust, reputation, or in the worst case, loss of the entire business. In this post, we will describe some of the security features of Codemagic CI/CD to give you a better understanding of how we ensure the security of your source code and sensitive information.
Codemagic CI/CD security measures
Codemagic takes take security very seriously and handles all customer data with utmost care. Their infrastructure and software architecture have multiple layers of security mechanisms in place to ensure the security and integrity of your data.
Secure infrastructure
The underlying infrastructure for Codemagic builds is secured with SSH or HTTPS protocols for all the networking. It means that all the data you send to Codemagic or receive from Codemagic is fully encrypted. Your Flutter builds are run on virtual machines on Mac minis which are also physically secured in data centers. Each build runs in a separate environment where it boots a new virtual image. The build agents are not visible to public network due to firewalls. Only our internal virtual private network can be used to make connections from backend services to Macs.
Security of source code
Codemagic uses your source control system, such as GitHub, Bitbucket or Gitlab, to get access to the CI/CD features. Once you grant access to your source code management tool, we will keep the tokens encrypted in our database. These tokens can only be used to check out the source code on virtual machines. When your app is hosted on GitHub, Bitbucket or GitLab, we use OAuth tokens to perform various other tasks too: list branches, set webhooks, get latest commit information, update commit/PR statuses, etc. The source code checked out during the build is deleted from the virtual machine after the build and never stored on Codemagic. The employees of Nevercode have no access to your source code. If you ask for our assistance with investigating a possible issue with your build, we can take a look at the build logs which are retained after the build, but only if you share your build link with us.
Codemagic protects the integrity of your source code and doesn’t alter the code unless you have explicitly specified so in the build scripts. The only exceptions here are some platform-specific files that would have to be modified for successful building. For example, Codemagic modifies the project files for iOS to specify code signing settings during the build and injects a Gradle plugin to the Android component to gather build information and information about the artifacts to be generated.
Encryption of sensitive data
You can have Codemagic automatically deploy iOS and Android apps to App Store Connect and Google Play Store. However, in order to deploy apps, we need your login credentials, certificates with private keys, provisioning profiles, keystore file. This information is extremely sensitive and we understand the importance of keeping this data safe. All credentials, certificates and keys that you provide to Codemagic are encrypted with strong passwords and kept securely in a private GCloud bucket to which our backend has no read access. The sensitive files can be downloaded during the build only from the specific virtual machine where the build is running.
Codemagic also enables users to store sensitive information as secure environment variables which, unless you expose them in a custom script, are available only to a specific virtual machine during the build.
No storage of data after build
Your app’s builds take place in virtualized environments. At the end of each build, the virtual environment is erased and rebuilt using a snapshot that has no knowledge of your app’s source code. All the build data, including your source code, sensitive information, build artifacts and test reports, are cleaned once the build finishes. The only build artifacts that are kept are the ones that are shown in build logs and are available for download.
Safe payments
Codemagic doesn’t process, collect or store any data related to payments. We have no knowledge of your credit card information and are not directly involved in making the transactions. Instead, we use the Stripe payments platform for all payment actions which is integrated into Codemagic by use of designable iframes. Stripe is used and trusted by numerous companies all around the world, including Amazon, Google and Microsoft.
Strong legal agreement
In compliance with EU’s General Data Protection Regulation, we are committed to keeping your sensitive data and private information safe. We protect your personal information and private data by encrypting all the network traffic between you and our servers and storing your data in an encrypted format, as also stated in our privacy policy. Codemagic uses the collected information only for services provision and improvement, billing, identification and authentication, contact and research, all the while making use of best practises in data management. Users retain all rights to their information and can request to have all their content deleted from Codemagic. For enterprise customers that wish to regulate their use of service in additional details, Codemagic can offer a service-level agreement (SLA).
Conclusion of the Codemagic security
As a CI/CD service provider to both individuals and businesses, we consider security one of our key concerns. Now that you know more about the security measures we have in place, we hope you can rest assured that your sensitive data, intellectual property and source code are safe with us. If you have additional questions about security on Codemagic, do not hesitate to reach out to us on Slack or at info@codemagic.io.
Testing with Codemagic CI/CD tool
Testing is extremely important when it comes to the mobile app development lifecycle. Many companies say that it’s never too early to begin testing an application. If the end user perceives bad performance from your app, they will most likely never visit your app again.
We can see that more and more teams use our continuous integration tool for testing. Codemagic has different integrations that are meant to help teams to set up testing quickly and easily so that they can focus on development.
Automated testing with a continuous integration tool
As a mobile app developer, it’s a great practice to test the app with a solid set of automated tests to verify that the code is functional. The testing phase may consist of several types of tests, such as UI tests, integration tests, and unit tests. Codemagic makes it easy to automate the testing of your apps. You can choose to run tests on an iOS simulator, an Android emulator, or on real devices, as well as set up your customized workflow for testing with different tools.
By default, Codemagic will run your tests as part of the build process. If your tests don’t pass, you can have Codemagic stop the build and avoid pushing it to the stores.
Running functional tests on a mobile application requires the use of an emulator/simulator or a physical device. Running tests on emulators/simulators is a reasonable start, but then again, there are also bugs that you can’t just find on emulators and simulators. Besides that, your users are using real devices, not virtual environments, which is why it makes sense to test your mobile applications with real devices.
With a cloud-based device lab like Firebase Test Lab for Android or Amazon Web Services (AWS) Device Farm, you can run tests and interact with a large selection of physical devices without actually having to invest in their ownership or setup.
Take a look at our mobile testing integrations, which will help you implement automated testing directly from your CI/CD pipeline:
Integrations that help you with test automation
Integration |
Description |
|---|---|
| Appium is an open-source test automation framework for use with native, hybrid, and mobile web apps. Simply install your npm dependencies to run tests as part of your Codemagic workflow. | |
| Detox is an end-to-end mobile UI testing framework for your React Native apps. It’s a ‘gray-box’ testing tool, which means it can access the code and data of your mobile app. It can be used with test runners such as Jest or Mocha and is generally faster than testing frameworks that use a client-server approach. | |
| Test your Android apps with the Espresso testing framework. Simply run the Gradle task to execute tests. | |
| Selendroid is a test automation framework that drives off the UI of Android native and hybrid applications. With codemagic.yaml, you can install additional software and run any commands to customize your build pipeline. |
Test on real devices directly from your CI/CD pipeline
A lot of the time, your build process will just be as simple as your code being checked out, tested, built, and then signed. Sometimes, though, it’s not always that easy, and you need some unique custom functionality in your build process.
Codemagic is happy to process your build for you, but it works equally well if you want to handle every step yourself. It achieves the latter by allowing you to supply a codemagic.yaml for testing and building. It helps you easily customize your workflows so that you can integrate different tools for testing your mobile application. In order to do that, use codemagic.yaml to connect your tools and services to automate your pipeline.
Take a look at our mobile testing integrations, which will help you facilitate and manage mobile environment testing directly from your CI/CD pipeline:
Integrations that help you with testing on real devices
Integration |
Description |
|---|---|
| AWS Device Farm lets you test your mobile app in parallel against a massive collection of physical devices in the AWS Cloud. Add your AWS Device Farm credentials as environment variables in codemagic.yaml to integrate real device testing into your workflow. AWS CLI tools are preinstalled on Codemagic build machines—see the preinstalled software here. | |
| Firebase Test Lab is a cloud-based app-testing infrastructure. Test your Android or iOS app across a wide variety of devices and device configurations as part of your Codemagic workflow. | |
| BrowserStack gives you instant access to 2000+ browsers and real iOS and Android devices for cross-browser testing. Test your Android or iOS app on BrowserStack as part of your Codemagic workflow. | |
| Sauce Labs is a cloud-based continuous testing platform for mobile and web apps. Integrate testing on real devices into your Codemagic workflow using codemagic.yaml. |
See how to get started with Codemagic using codemagic.yaml.
Useful links if you’re interested in testing:
- Codemagic Documentation: Testing
- codemagic.yaml related articles
- Testing related articles
- Codemagic Integrations
Top 12 configuration mistakes that will fail your mobile CI build
1. Inconsistency in build tools
Mobile apps use build tools to automate all the build process tasks. Examples of the build tools are Gradle and Fastlane.
The most common build errors come from the wrong configuration of the tools or plugins.
The majority of the Flutter Android builds recently failed due to the misconfiguration of the Gradle. The issues like unable to lint, issues using Flutter with other SDKs and wrong class paths are the most common issues in the Flutter Github issue list. At the moment, there are still 103 open issues related to Gradle on the Flutter Github repo. App developers are recommended to keep an eye on the issues and update their projects accordingly.
2. Difference in programming language versions
Currently, native mobile apps are developed in Swift and Kotlin while cross-platform mobile apps are developed in Dart (Flutter) or JavaScript (React Native). Most of these languages are still evolving in terms of new features and development.
While developing apps, we have to make sure that we are using the correct version of the programming language. Usually, we need to explicitly specify the programming language version in our code or CI configuration.
Flutter has just released the stable version and is still undergoing changes. The Dart programming language is also evolving with Flutter. In order to avoid Dart version issues, we have to specify the versions of both Flutter and Dart which are compatible with our existing projects. The Flutter SDK version can be specified in the `pubspec.yaml` file.
3. Poor dependency management
Most mobile applications use third-party frameworks to develop the apps faster by reusing existing source code. Swift uses CocoaPods or Carthage or Swift Package Manager, Kotlin uses Gradle, Flutter (Dart) uses Pub Package Manager, etc.
It’s essential to lock the dependencies used for the project while developing so that changes in the dependency framework won’t break the current development workflow.
The best way to lock dependencies is by using the .lock file or a similar file provided by a dependency management tool. It’s also a great practice to check in the .lock file to the source control so that the entire development team and the CI server use the same version of the dependency framework.
Flutter uses Pub package manager to manage all the dependencies in the pubspec.yaml file. We have to make sure that all the versions of the SDK and dependency framework are locked during development. Flutter’s test package is a good example of this scenario as there were recently breaking changes in it which broke all the Flutter builds with unit and widget tests.
4. Missing platform checks (iOS or Android or both)
While developing cross-platform mobile apps for both iOS and Android, it’s important to check that the build runs successfully for both platforms in the local machine.
Some common build failures are that the app builds fine for iOS, but not for Android, or vice versa.
With Flutter apps, it’s a good practice to develop against both platforms, that is iOS and Android, and fix platform-specific errors before CI builds are run. This approach will save a lot of time and gives fast feedback on development.
5. Missing environment variables
It’s a common practice for continuous integration tools to use environment variables to access dynamic or sensitive data. These variables are usually present in the local machine, however developers might not realize that environment variables need to be set on the CI server as well. Another common mistake would be changing the value of the environment variable.
Whenever we change an environment variable locally, it needs to be updated on the CI server as well to avoid build failures.
6. Missing pre-build and post-build actions
Some mobile apps have a complex build process which involves custom scripting, downloading project-specific tools or publishing reports to specific reporting tools. Continuous integration services not necessarily have all the features required for the custom build process, so they provide options to execute the scripts before or after the specific build steps.
Build failures in that regard are most commonly caused by missing build steps before performing a specific action. If the build scripts are not coded, it’s important to add those scripts in the CI configuration.
7. Flakiness
Flakiness is a major cause of build failures during the CI process. Flakiness can come from anywhere in mobile app development. Commonly tests are flaky, but there are some other factors that can be flaky as well and cause tests to become flaky. Sometimes it’s the case that the test environments are not reliable, sometimes it’s the bad coding that causes inconsistent behaviour in the app. This makes the entire app become flaky.
Flaky builds are very time consuming and hard to debug. It’s important to remove all the flakiness during app development.
8. Cached vs clean builds
Caching project dependencies is a great way to speed up mobile CI builds. Most of the CI solutions provide support for caching the dependencies. However, sometimes cached dependencies can cause build failures, especially when we have upgraded dependencies to a newer version locally, but the CI server still uses cached dependencies.
It’s important to update the cached dependencies by performing clean builds whenever a dependency version is changed.
It’s good to have separate workflows to perform clean builds in addition to a cached workflow so that we can detect the breaking build steps or code changes early.
9. Code signing
Code signing for both iOS and Android apps are very tedious and complex steps in the build process. Especially for iOS apps, as there are so many moving parts in the code signing process. Code signing errors are very common because of the complexity of the process. There are various build failures due to code signing, the most common ones are as follows.
- Providing wrong credential to CI server
This error occurs when the CI server can’t login into the App Store Connect account. A typical error looks like this:
Unable to validate your application. Your Apple ID or password was entered incorrectly.
Or if your account uses 2FA, then the error looks like this:
Unable to validate your application. Please sign in with an app-specific password. You can create one at appleid.apple.com.
It is essential to provide the right credential to the CI server with correct rights to avoid this kind of build failures.
- Wrong bundle identifier or provisioning profile
It happens quite often that App Store Connect has many provisioning profiles and the CI server gets confused about which one to use, or there is no matching bundle identifier or provisioning profile available. Some of the common errors are:
Provisioning profile “For Debug Build” doesn’t include the aps-environment entitlement.
Provisioning profile “xxxx” has app ID “com.example.xxx”, which does not match the bundle ID “com.example.zzz”.
You may have encountered various other errors related to this topic, but the idea is to sort out the code signing assets to avoid this kind of build failures.
- Android keystore error
Android code signing uses the keystore from the project build setting. When the keystore is not detected at the right path, the CI server might throw this error:
Failed to read key keyname from store “/tpath_to/keystore.private”: Cannot recover key
Make sure you have entered the correct credential and keystore in the build settings to avoid these errors.
10. Missing version bump
Continuous delivery practices make it possible to use release trains which contain multiple builds for a specific version. However, one of the requirements for uploading a new build is to increment the build number so that the new build number is always greater than the previous one. The most common mistake while uploading a new build is forgetting to bump the build number. This causes the following error in iOS deployment:
The value for key CFBundleShortVersionString [0.0.1] in the Info.plist file must contain a higher version than that of the previously approved version [1.0.0]
There might be a similar error for Android builds. You should have in place an automated way for incrementing the build number for each new build to avoid this kind of mistakes.
11. Invalid App Store or Play Store assets
Build failures caused by invalid App Store Icon or Play Store Assets are very expensive as such failures are detected in a later phase of the build process. The error will look like this:
“Invalid App Store Icon. The App Store Icon in the asset catalog in ‘your.app’ can’t be transparent nor contain an alpha channel."
In order to fix those errors, we have to get the right assets and perform the build again, especially while deploying the app to Apple App Store or Google Play Store. It would be worth checking that all the assets are compatible with App Store and Play Store guidelines.
12. Cocoapods installation
Cocoapods is the dependency manager required for iOS applications. Some iOS apps require the newer version of Cocoapods 0.32.1 or above. There are a couple of methods generally used to install Cocoapods, the two most common methods being Rubygems and Homebrew. The Ruby gem method sometimes fails on the default Ruby (2.0.0) installed on the macOS, we would then need to use RVM or similar tools to switch between Ruby versions. By using the Rubygem method of installation, we can change the versions of Cocoapods while the Homebrew method always installs the latest version. Build failures often come from the different installation methods of the Cocoapods. Some build failures occur because Cocoapods crash with segmentation fault. It’s a good practice to choose the mechanism of installing Cocoapods with a compatible Ruby version to avoid Cocoapods related build failures. The best and recommended way to install Cocoapods is by using Rubygem, as mentioned on the official Cocoapods site.
Conclusion
The CI/CD process for mobile and desktop apps has become mandatory in order to deliver quality apps to the end user and avoid the cost of bugs in the later phases. Especially for the apps developed with cross-platform development technologies. It’s useful to have a trustworthy CI/CD platform for building and publishing mobile apps.

