


")
Written by Jahswill Samuel
Dart and Flutter are a powerful duo when building software applications, ranging from mobile apps - Android and iOS; to desktop apps - Linux, Windows, and macOS.
Flutter is sufficient to handle most application features. However, some apps involve deeper integration with their platform components. Flutter boasts of smooth and easy-to-setup mechanisms for communication between Flutter and platform hosts.
Overview
By reading this article, you’ll get to understand the following:
- When to set up communication between Flutter and native components.
- What platform channel, pigeon, and FFI are.
- How to utilize these communication mechanisms.
- Use cases of such mechanisms in action.
It’s a hands-on article. You’ll have a chance to practice these concepts as you read. You’ll be working on a simple demo application that creates a text file in the user’s device based on user-defined inputs. This app will be compatible with Android, iOS, and macOS.
We’ll first employ method channels to build this feature for Android and IOS. Then revamp the code to use pigeon. Finally, we will use FFI to implement this feature on macOS.
To follow through with setting up FFI for macOS, you need to have a MacBook system. In addition, you need Xcode installed on your system.
The target audience for this article is mid to senior-level Flutter developers.
Get Started
Clone the Flutter project by running the command git clone git@github.com:JasperEssien2/text_editors.git -b "method-channel-tasks".
The lib/main.dart contains the entry-point of the Flutter app, including the MyHomePage widget. When a tap occurs on the save button, the saveFile() method of the SaveFileService class is called.
The SaveFileService is an abstract class we define. It is a wrapper around communication code. For every communication mechanism we add, we will implement this abstract class. It is designed this way for easy switching between communication implementations.
abstract class SaveFileService {
  FutureOr<bool> saveFile({required String fileName, required String text});
}
When to set up communication between Flutter and native components.
Integrating platform-specific features like geolocation, alarm, sensors, notification, sound, camera, and device information e.t.c., need to establish communication with the platform host.
One thing to keep in mind is that there’s a high possibility that a plugin or package is available on pub.dev that handles your need.
There are some options to choose from to accomplish communication. Let’s start with exploring platform channels.
Platform channels
The platform channel is a mechanism used to establish communication between Flutter and the host platform. Its process involves sending messages from Flutter to the host platform to handle necessary logic - expecting a success or an error response. The communication is bi-directional.
There are two major implementations of platform channels in Flutter: MethodChannel and EventChannel.
- MethodChannel: Is a named channel that process it’s messages in an asynchronous way. It’s best suited for a one-time task. For example, retrieving a device battery status. Our focus will be on this.
- EventChannel: Is a named channel that process it’s messages using a stream. It’s best suited for tasks that need frequent updates. For example, listening to a device’s motion sensor.
Implementation
The proceeding subsections demonstrate the implementation of the method channel on two platforms: Android and iOS.
Dart implementation
We first need to set up communication on the Dart side. Head over to lib/save_file_service.dart. In the MethodChannelService class, there are some TODOs to handle.
Start by creating a channel for communication.
Replace TODO1 with the code snippet.
 static const _methodChannel =
      MethodChannel("com.example.text_editors/action");
By creating an instance of MethodChannel we are setting up a pipe that connects Flutter and the host platform.
The MethodChannel constructor has three parameters:
1. String name:
A string that identifies this channel. This name must be unique for each channel created and must match its native counterpart.
2. MethodCodec codec:
Different platforms have different data types. For instance, Dart Map is HashMap and NSDictionary in Java and Objective-C respectively. The best bet is to transform and send data in bytes and get the receiving platform to interpret byte data. The MethodCodec is tasked with this responsibility.
The MethodCodec is an abstract class with method signatures to encode into byte data and decode from byte data: method calls, error, and success data.
By default MethodChannel uses the StandardMethodCodec implementation. This parameter is optional.
To check out more datatypes supported by
StandardMethodCodecclick here.
3. BinaryMessenger binaryMessenger:
The MethodChannel and EventChannel uses BinaryMessenger under the hood to send byte data across the host platform. This parameter is optional since a default BinaryMessenger is provided.
Now that we have created a channel for communication, the next step is to use the channel to invoke a method.
Replace TODO2 in the saveFile() method with the code snippet.
    /// Wrap invocation in a try-catch
    try {
      /// Invoke a method and pass in necessary arguments, await a response
      return await _methodChannel.invokeMethod(
        "createFile",
        {
          'fileName': fileName,
          'content': text,
        },
      );
    } catch (e) {
      /// Return false when an error occurs to signify that attempt to save the file failed
      return false;
    }
With the above implementation, when the saveFile() method is called, it requests for the “createFile” action to be handled by the host platform sending a file name and content alongside.
The method channel has three invoke methods:
invokeMethod<T>()sends a message through the channel and expects a future single-type value.invokeMapMethod<K, V>()sends a message through the channel and expects a future map with keys and values.invokeListMethod<List<T>()sends a message through the channel and expects a future list of typeT.
We are wrapping calls in a try-catch block because two exceptions can occur.
PlatformExceptiontriggered when the invocation failed in the platform host.MissingPluginExceptiontriggered when the host counterpart hasn’t implemented this method name.
The MissingPluginException is thrown if the application is run at this point. The proceeding sections will guide you through implementating method channel on the host platforms.
Keep in mind that every channel created on the Flutter side, the channel name has to correspond to its native implementation.
Android implementation
Head over to /android/app/src/main/kotlin/com/example/text_editors/MainActivity.kt. The MainActivity in android, is the first screen to appear when an android app is launched. In Flutter, the MainActivity is a subclass of FlutterActivity, which create its own FlutterEngine.
To create a method channel in Android, access to the FlutterEngine is needed. Override the configureFlutterEngine() method to gain access to the FlutterEngine.
FlutterEngineis the core of Flutter. It’s the container through which Dart can run in host platforms. It is responsible for rendering flutter screens in the platform host.
Replace TODO 1 with the code snippet below:
    val methodChannel = MethodChannel(
            flutterEngine.dartExecutor.binaryMessenger,
            channelName
        )
We are creating an instance of MethodChannel. It requires a BinaryMessenger. We can get an instance from the dart executor of the flutter engine. Then, we pass in a channelName` which must correspond to its Dart counterpart.
Next, we set up a method call handler, that will listen and handle messages from Dart. Replace TODO 2 with the code snippet.
    methodChannel.setMethodCallHandler { call, result ->
        //Extract the argument as a map
        val args = call.arguments as Map<*, *>

        //The [when] keyword in kotlin is similar to the [switch] keyword in dart
        when (call.method) {
            ///When method name matches "createFile" call the `createTextFile()` method passing in required arguments
            "createFile" -> {
                createTextFile(
                    args["fileName"] as String,
                    args["content"] as String,
                    result
                )
            }
        }

    }
Next, we need to return a success if the creation of the text file succeeds otherwise an error is returned. We do that by using the MethodChannel.Result callback to send a response back to Dart.
Replace TODO 3 and TODO 4 with result.success(true) and result.error("0", e.message, e.cause) respectively.
With this, you can now run the application on your android device or emulator. Input a file name and the file content. Then click on the save button. Notice that the file is saved successfully.
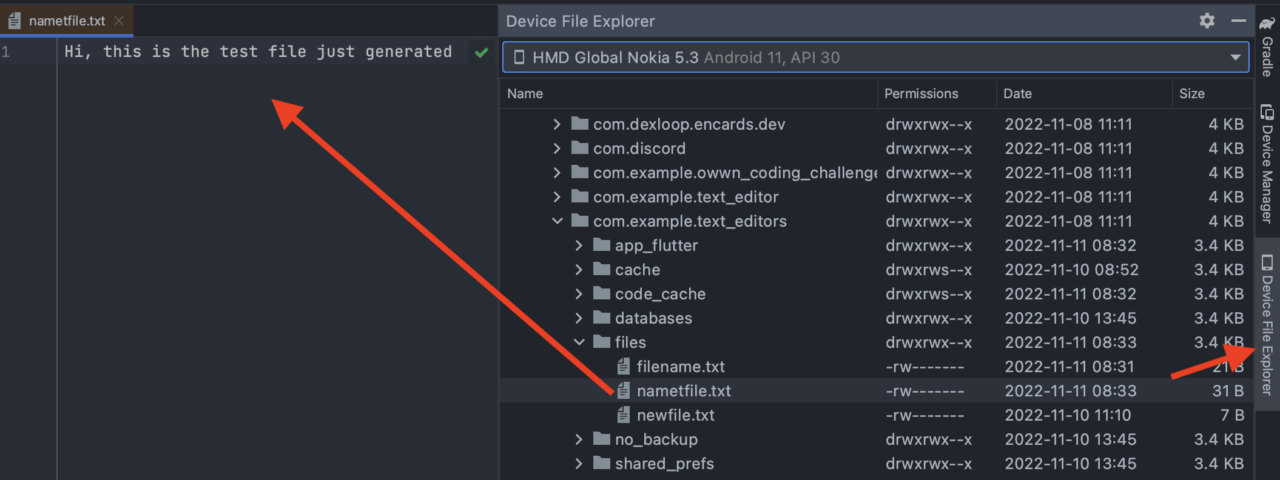
Prioritising simplicity, files saved will be saved in the internal storage of the device which cannot be accessed by other apps. You can use Android Studio to confirm the file saved successfully.
On the side tab of Android Studio click Device File Explorer -> data -> data -> com.example.text_editors -> files. You’ll see text files successfully saved.
IOS implementation
The implementation of IOS is similar to the Android setup.
Head over to /ios/Runner/AppDelegate.swift. The AppDelegate in ios, is the root object of an ios application.
The first thing is to get access to FlutterViewController. Replace TODO1 with the code below.
let controller : FlutterViewController = window?.rootViewController as! FlutterViewController
The
FlutterViewControlleris a subclass ofUIViewControllerand is attached to theFlutterEngine. Flutter works withFlutterViewControllerto display Flutter screens on IOS.
Replace TODO2 with the line of code below.
let methodChannel = FlutterMethodChannel(name: channelName, binaryMessenger: controller.binaryMessenger)
Replace TODO3 with the line of code below.
     methodChannel.setMethodCallHandler({
          (call, result) -> () in

          //Check the call method, continue if "createFile" else send back an error
          guard call.method == "createFile" else{
              result(FlutterMethodNotImplemented)
                return
          }

          // Get method arguments
          let arguments = call.arguments as! NSDictionary

          // Call function to create a file.
          self.createTextFile(fileName: arguments["fileName"] as! String, fileContent: arguments["content"] as! String, result:result)
      })
Send back true if the file is saved successfully otherwise false.
Replace TODO4 and TODO5 with result(true) and result(FlutterError(code: "0", message: "Saving file failed", details: nil)) respectively.
With method channel setup for both platforms is complete. You can now run both applications. You can view the complete method channel implementation by git checkout method-channel-implementation
The next section explores the pigeon package.
Pigeon package
The Pigeon package is a code generation tool. Based on your specification, It generates all the code needed for communication between Dart and native platforms in a type-safe, easy, and efficient way.
Pigeon supports generating Objective-C and Swift code for IOS, Java and Kotlin code for Android, and C++ for Windows. However, at the time of writing this article, support for Swift, Kotlin, and C++ are experimental.
Pigeon setup
To get started, run the command dart pub add --dev pigeon on your terminal to add pigeon as a dev dependency.
Next, create a folder named pigeons in the root folder of your flutter app. Then create a file_api.dart file. This file will contain the specifications we need to generate the communication code.
We’ll be defining a payload class that would be sent as a message to native platforms, and a response class that we should expect. We’ll also define an abstract class that contains an interface for communication logic.
Insert the code below in the file_api.dart file created in the root folder.
import 'package:pigeon/pigeon.dart';

//Data class to be sent as a message
class FileData {
  String? fileName;
  String? content;
}

//Response from platform hosts
class Response {
  bool? successful;
  String? error;
}

@HostApi()
abstract class FileApi {
  ///This abstract function will contain code that performs communication
  ///with native platforms, sending in [FileData] as a message and receiving [Response] as a response.
  Response saveTextFile(FileData data);
}
Some things to note when dealing with this root file are:
- Only classes can be defined.
- The return type of abstract methods must be specified.
- Abstract classes should be annotated with
@HostApi()or@FlutterApi()annotations from the pigeon library.The above annotation is used to specify communication direction. Use
@HostApi()to configure sending messages from Flutter to the platform host. Use@FlutterApi()to configure sending messages from the platform host to Flutter.
After defining our code generation specifications, the next step would be to run the command below to generate the necessary code for communication.
flutter pub run pigeon \
  --input pigeons/file_api.dart \
  --dart_out lib/file_api.dart \
  --experimental_swift_out ios/Runner/FileApi.swift \
  --experimental_kotlin_out ./android/app/src/main/kotlin/com/example/text_editors/FileApi.kt \
  --java_package "com.example.text_editors"
Dissecting the pigeon command
Notice that for each line of command except the last, we append an escape character - “\”. By doing this, the terminal interprets the enter key as a new line, not a command to execute.
- Line one Instructs flutter to run the pigeon command-line app.
- Line two Set the input path which is the path of the file we defined in the root folder.
- Line three Specifies the path to generate the necessary dart code.
- Line four Specifies the path to generate the necessary swift code.
- Line five Specifies the path to generate the necessary kotlin code.
- Line six Sets the Java package of the app.
The generated files might look daunting, notwithstanding it is similar to the under-the-hood implementation of MethodChannel.
Understanding generated code
Taking the FileApi.kt file in the android folder as a use case. The following files were generated:
- Data classes that we specified in the root folder, named
FileDataandResponse. The generated code createdfromMap()andtoMap()methods.This makes our code typesafe. The
FileDatawill always be sent as messages, and theResponsedata class will always be expected as a response regardless of the platform we are dealing with. - A
FileApiCodecwhich usesStandardMessageCodecunder the hood, to encode data classes to byte and decode from byte to the data class. - An interface named
FileApiwhich we will be implementing to receive calls from Flutter. It contains a staticsetUp()method which we have to call inMainActivity, to handle messages fromBinaryMessenger.
Utilising generated code
In order to integrate this generated code into our Flutter app, we need to replace method channel implementation with that of the pigeon implementation on Dart, Android, and IOS.
Dart
To utilise the generated code for the Dart side. Head over to lib/save_file_service.dart. Create a class named PigeonFileService that implements the SaveFileService abstract class.
class PigeonFileApiService implements SaveFileService {

  ///Initialise the generated [FileApi]
  final _fileApi = FileApi();

  @override
  Future<bool> saveFile(
      {required String fileName, required String text}) async {
    try {

      /// Use the [_fileApi] to attempt instructing native platforms
      /// to save the text file based on the [FileData] data class
      final response = await _fileApi
          .saveTextFile(FileData(fileName: fileName, content: text));

      /// return the status of the request
      return response.successful!;
    } catch (e) {
      /// return [false] if an exception was thrown
      return false;
    }
  }
}
Next, In the main.dartfile, set the _saveFileService variable to an instance of PigeonFileApiService().
Before we can test run the implementation, we need to set up pigeon for our supported platforms.
Android
We need to perform some manual configurations for things to work as expected on the android app.
Step 1
Implement the generated FileApi interface. Head over to MainActivity.kt in the android folder, copy the code snippet and paste it below the MainActivity class declaration.
    class FileApiImpl(private val filesDir: File) : FileApi {

        override fun saveTextFile(data: FileData): Response {
            return try {
                /// Try to write and save the file
                val file = File(filesDir, "${data.fileName}.txt")

                file.writeText(data.content!!)

                /// Return [Reponse] and set to true if successful
                Response(successful = true)
            } catch (e: java.lang.Exception) {
                /// Return [Reponse] and set to false, set error message if creating file fails
                Response(successful = false, error = e.message)
            }
        }
    }
You will also need to import some classes as below. In practice, it is better to open the android project on Android Studio (or your preferred IDE) when implementing native code.
import FileApi
import FileData
import Response
Step 2
Delete all the code relating to the MethodChannel implementation.
Step 3
Initialise the FileApiImpl class under the configureFlutterEngine() method.
val fileApi = FileApiImpl(filesDir)
Step 4
Set up the FileApi communication immediately after the fileApi declaration.
    FileApi.setUp(
            binaryMessenger = flutterEngine.dartExecutor.binaryMessenger,
            api = fileApi
        )
Step 5
Finally, delete the previous createTextFile() method.
IOS
The setup for IOS is nearly identical to that of Android.
Step 1
Implement the generated FileApi protocol. Head over to AppDelegate.swift, and copy and paste the code snippet below.
The
protocolis swift way of defining aninterface.
class FileApiImpl : FileApi{
    func saveTextFile(data: FileData) -> Response {

        /// We try to create the file with the fileName and content gotten from the [FileData] class
        if let dir = FileManager.default.urls(for: .documentDirectory, in: .userDomainMask).first{

            let fileURL = dir.appendingPathComponent("\(data.fileName!).txt")

            do{
                try data.content!.write(to: fileURL, atomically: false, encoding: .utf8)
                /// Return a [Response] setting successful to true
                return Response(successful: true)
            }catch{
                /// Return a [Response] setting successful to false and setting an error text
                return Response(successful: false, error: "Saving file failed")
            }
        }

        return Response(successful: false, error: "Saving file failed")
    }
}
In iOS, importing classes in this case will be a little different than in Android as below steps:
- Open
iosproject in XCode - Right-click the Runner folder (Runner > Runner on the Navigator project), select Add Files to Runner…
- Find and select FileApi.swift (this file is generated by pigeon, located in Runner folder) (You don’t need to import FileApi/FileData/Response like in Android)
Step 2
Delete all the code relating to the MethodChannel implementation.
Step 3
Initialise the FileApiImpl class under the application() method of AppDelegate.swift.
let fileApi = FileApiImpl()
Step 4
Set up the FileApi communication, by inserting the line of code below.
let controller : FlutterViewController = window?.rootViewController as! FlutterViewController

FileApiSetup.setUp(binaryMessenger: controller.binaryMessenger, api: fileApi)
Step 5
Delete the previous createTextFile() method.
With that, we’ve been able to set up the pigeon successfully. If you got stuck along the way, you can git checkout pigeon-implementation to see the completed implementation of pigeon.
Ensure to update lib/main.dart to use the PigeonFileApiService.
late SaveFileService _saveFileService = PigeonFileApiService();
There’s a more flexible, faster approach that Flutter provides for interaction with native components, FFI.
Foreign Function Interface (FFI)
FFI enables C APIs to be used directly from Dart on the same thread, unlike method channels that asynchronously send messages between platforms on different threads. It also supports languages that can be compiled into C, like C++, Objective-C, Rust and so on.
Step 1: Implement C++ code
Head over to the macos folder, create a new folder named Classes, then create a c++ file named file_api.cpp.
The file extension for c++ program is
.cpp
Insert the code snippet below in the newly created file. Ensure to read the comments for better understanding of the code.
/*
The include statement is similar to Dart import statement. We are importing libraries to aid us in our task.
*/
#include <sstream>
#include <iostream>
#include <fstream>
using namespace std;

/*
The FFI library can only bind C symbols. We must mark code written with C++ with extern "C".

C++ language supports function overloading. During compilation the compiler does
"name mangling" - altering function names to add extra information to overloaded functions.

C language does not support overloading, therefore the extern "C" tells the compiler not to mangle function names.

The linker during compilation performs optimization by eliminating functions that appear to not be referenced.
By adding the attributes we prevent this from happening since we are referencing this function directly from Dart.
*/
extern "C" __attribute__((visibility("default"))) __attribute__((used))

bool createTextFile(char *fileName, char *content){
    try
    {
        // Get the home path
        const char *homeDir = getenv("HOME");

        // Concatenates the path with file name and extension
        std::ostringstream oss;
        oss <<  homeDir << "/" << fileName << ".txt";
        std::string filePath = oss.str();

        //Logs the file name and path to console
        cout << "fileName: " << fileName << " PATH: " << filePath << endl;

        std::ofstream myFile;

        //Open the file
        myFile.open(filePath);

        // Write content to the file
        myFile << content;

        // Close the file stream
        myFile.close();

        // return true to indicate the file saved successfully
        return true;
    }
    catch(...)
    {
        //Log errors in the console
        std::cerr << "An error occurred" << '\n';

        // Return false to indicate saving file failed
        return false;
    }
}
Step 2: Link the C++ library to the app
Native libraries can be linked to an app in a static or dynamic way. Static libraries are loaded at compile time. They are embedded into the app’s executable image and are loaded at the start of the program.
On the contrary, dynamic libraries exist in a separate file outside the executable image. They are loaded on demand.
In our case, we will link our native library dynamically. To generate a dynamic library from our C++ code for macOS, run the code below on the terminal.
Note: You have to change the directory on your terminal to the directory containing the C++ library.
g++ -dynamiclib -o file_api.dylib file_api.cpp
Afile_api.dylib file should be generated after a successful execution of the command above.
While this article focuses on generating and using a dynamic library for macOS, it is important to note that a dynamic library for Linux and Android (a Linux-based system) and windows can be generated. They have the extensions
.soand.dllrespectively.
Afterwards, we add this library to the macOS desktop app by following the instructions below.
Open the
text_editors/macos/Runner.xcworkspacein Xcode.Drag the
file_api.dylibto theRunners/Frameworks.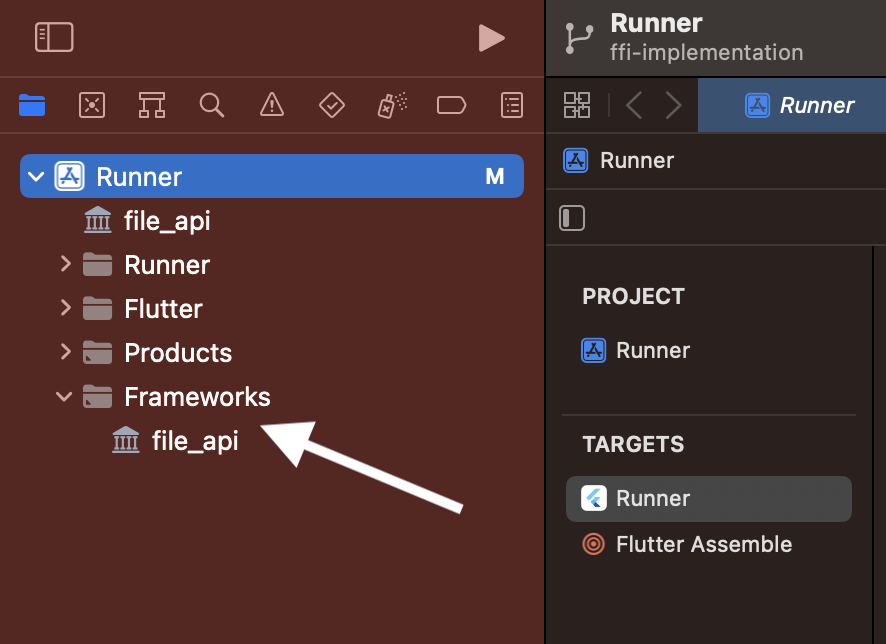
Click Runner and tap on the Build Phases tab.
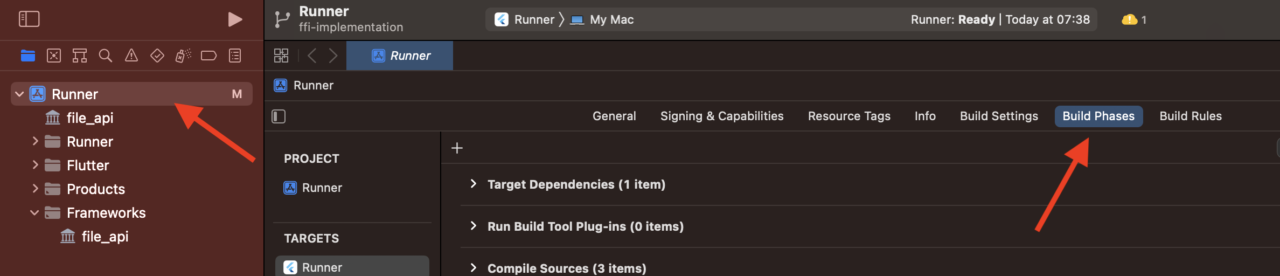
Drag the
file_api.dylibinto Copy Bundle Resource.
Go to Link Binary with Libraries, change the status to Optional since we are linking the C++ library dynamically.

Click on Runner -> Build Settings, and ensure the path where
file_api.dylibis located, is included in the search path.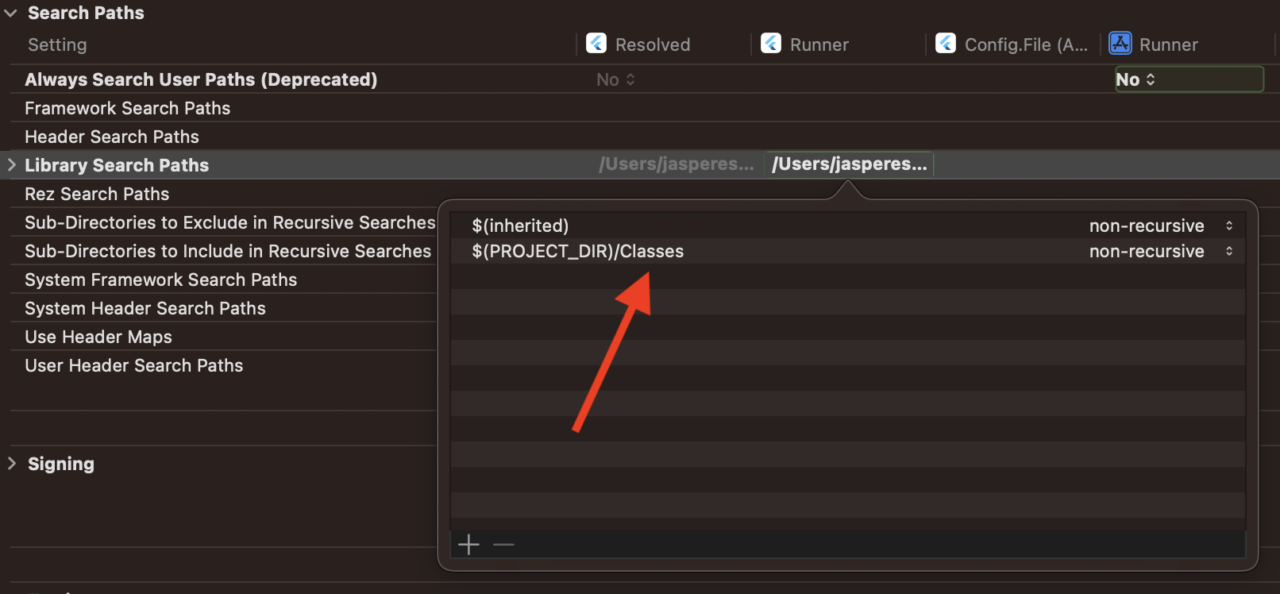
We’ve successfully added the library to the macOS application. The next step is to utilise this C++ library from Dart.
Step 3: Bind Dart code to C++ Library
Calling C functions from Dart can be summarised into three stages: Open Library -> Lookup Library -> Call Function.
Before diving into the first stage, let’s set up some code in the lib/save_file_service.dart file.
Setup
Run flutter pub add ffi to add the ffi utility package to the project. Then import the packages:
/// Contains code that aids interaction between Dart and native APIs.
import 'dart:ffi' as ffi;

/// Contains utilities for working with FFI. In this example, the package
/// is used to convert between Dart string and C strings
import 'package:ffi/ffi.dart';
Next, define some typedef variables. We’ll explore the code below in the Lookup Library section.
typedef CreateFileDart = bool Function(
    ffi.Pointer<Utf8> fileName, ffi.Pointer<Utf8> content);

typedef CreateFileNative = ffi.Bool Function(
    ffi.Pointer<Utf8> fileName, ffi.Pointer<Utf8> content);
Next, create a class that implements SaveFileService named FFIFileApiService. Implement the saveFile() method.
Open Library
To load a dynamic library, use the DynamicLibrary.open() passing in the path to the dynamic library.
final ffi.DynamicLibrary nativeCreateFile = ffi.DynamicLibrary.open("file_api.dylib");
Insert the code above in the saveFile() method of the FFIFileApiService class.
Lookup Function
We can find C library functions using its name. The DynamicLibrary object contains methods for this.
Append the code snippet to the saveFile() method.
final createTextFileFunction = nativeCreateFile
        .lookupFunction<CreateFileNative, CreateFileDart>("createTextFile");
The lookupFunction() is a generic function. It finds a C function by name and then returns a Dart function. It accepts the method signature for the C function and Dart function as generic parameters due to the different type systems of C and Dart.
The signature for the Dart and C functions (as shown in the typedefs we declared) are similar except for the return type. The Pointer<Utf8> is equivalent to a char pointer (char *stringVar) in C/C++.
char pointer in C can be used to store string literals.
Call Function
If the lookup is successful, we can call the createTextFileFunction variable as a function passing in the fileName and text string as a Pointer<Utf8> object.
The FFI package provides a helper extension to perform conversion from Dart String to Pointer<Utf8>.
final fileNameUtf8 = fileName.toNativeUtf8();
final contentUtf8 = text.toNativeUtf8();

final bool successful = createTextFileFunction(fileNameUtf8, contentUtf8);
In languages like C and C++, programmers have to manage memory themselves. We can free up memory in Dart by using the FFI package malloc.free() method.
malloc.free(fileNameUtf8);
malloc.free(contentUtf8);
Don’t forget to return the successful return value to keep our compiler happy.
We need to make a final adjustment in the lib/main.dart file. We want to use the FFIFileApiService if the app is currently running on a macOS system, otherwise use the PigeonFileApiService implementation.
Update the initState() with the code snippet.
@override
  void initState() {
    if (Platform.isMacOS) {
      _saveFileService = FFIFileApiService();
    }

    super.initState();
  }
Run the application on macOS input a file name and content and save. As shown in the logs, the text file would be saved in the Users/$(username)/Library/Containers/com.example.textEditors/Data/ directory.
To understand why this is the default storage location, visit this stackexchange answer https://apple.stackexchange.com/a/290312
To see a completed version of FFI implementation, git checkout ffi-implementation.
You’re probably wondering how tedious it will be to write FFI binding code for a more complex and larger native library. The flutter team understanding this created ffigen a library that can generate FFI bindings using C headers.
How to use the ffigen library is out of the scope of this article. Read more about the tool here.
Use cases of method channel, pigeon, and FFI
You’ve probably concluded that there isn’t a “best” choice. It all depends on what you are trying to achieve. Nevertheless, you need to keep some tips in mind.
Method channel
Method channel is best suited for a small-scale project where you need to send and receive simple datatypes (int, bool, string) across platforms. It has less code complexity when compared to its contenders. While it is easy to set up as compared to FFI it has a lot of drawbacks.
- Messages aren’t typesafe: There’s no guarantee that arguments sent across the platform are parsed correctly. Care should be taken to match channel, method names, and argument keys across the platforms you support.
- Increased development time: Method channel increases development time, due to performing the same setup across all supported platforms.
- Less performant: Method channel works by sending messages across platforms asynchronously. It shuffles messages between the Dart UI thread and the Platform thread while serializing and deserializing these messages.
- Harder to refactor: Due to hardcoded strings, it is harder to refactor method channel implementations.
Pigeon
Pigeon is best suited for large-scale applications. It offers a typesafe, easy-to-setup communication mechanism. It saves development time with its code generation feature.
Internally its operation is similar to that of the method channel, which results in it being less performant compared to FFI.
FFI
FFI is best suited for situations like:
- Utilising platform libraries written in C to access native operating system services.
- Directly calling code of programming languages compatible with C in Dart. Languages like C++, Objective-C, Swift, Java, Rust, and Go.
- Working with legacy code written in C.
- Working with applications that require high performance.
FFI is much more performant. It synchronously interacts with the native component on the same thread. By using FFI you get a less platform-dependent setup.
As a drawback, it introduces code complexities which can be managed by using the ffigen generation tool.
Conclusion
Flutter being a multiplatform framework provides means of communicating with native components. We considered three of them: MethodChannel, Pigeon, and FFI while getting our hands dirty on their implementation.
Hopefully, with this knowledge, you can be confident in tackling any Dart to native interaction feature.
Are you up for a challenge? How about modifying the app to read and display files created? Currently, we only write files to the user’s device.


